Vue Basic
- 1. What is Vuejs
- 2. 설치, 프로젝트생성, 구조
- 3. 라우터
- 4. 데이터바인딩
- 5. 이벤트
- 6. 렌더링
- 7. computed, watch
- 8. lifecycle hook
- 9. component
- 10. bootstrap
- 11. SimpleGrid
- 12. Slot
- 13. Layout Component
- 14. provide, inject
- 15. 참고
1. What is Vuejs

IMPORTANT
Vue.js ?
User Interface 개발을 위한 Progressive Framework이며, Native & Web의 장점을 모두 수용하고 표준 패텬을 사용해 개발
SPA(Single Page Application)
MVVM(Model-View-ViewModel) Pattern
Angular 양방향,React 가상돔장점을 모두 채택
- 장점
- 러닝커브가 낮다.
- 재사용 가능한 Component 사용
- Angular.js의 Two-Way Binding 수용
- React의 Virtural DOM 수용<
- 기대효과
- 높은 수준의 웹 애플리케이션 제작 가능
- 안정적이고 체계적인 운영 지원

2. 설치, 프로젝트생성, 구조
IMPORTANT
- vuejs 설치
- vuejs 프로젝트 생성
- 프로젝트 구성
- vuejs 설치
//0.1 npm 설치가 선행되어야 함
npm -v

// 0.2 vue 설치
vue --version
npm install -g vue //windows OS
sudo npm install -g vue //Mac OS

// 0.2 vue cli : vue 프로젝트 생성을 위한 command line interface
sudo npm install -g @vue/cli //Mac OS는 sudo 추가

// 0.3 visual studio code > extension 설치
// Vetur : code snippet, highlight ...
- vuejs 프로젝트 생성
-
수동으로 프로젝트 생성 및 Preset 저장
-
// 프로젝트를 생성할 경로에서 명령어 실행
vue create [projectname]

// 'manually select features'
// - Router, Vuex 선택
// - 3.x 버전 선택(최신 버전) - 많은 오픈소스 모듈이 아직 3.x 버전으로 업그레이드 되지 않았음
// - history mode > y 선택
// - ESLint + Standard config 선택
// - Lint on save 선택
// - In package.json 선택
// - Preset > y 선택
// - Preset Name > vue basic 입력
-
- 프로젝트 구성

- node_modules : 설치된 node 모듈이 위치해 있는 폴더. npm install 명령어를 통해 설치한 모듈이 위치
- public : index.html 파일이 위치하는 곳 (정적 파일이 위치)
- src : 구현되는 vue 컴포넌트 파일이 위치
- src > assets : css, image 등 파일
- src > components : Vue 컴포넌트 중 재사용을 위해서 구현된 컴포넌트 위치
- src > router : 라우팅을 정의하는 파일이 위치
- src > store : vuex의 상태저장소인 store 파일이 위치
- src > views : 웹 애플리케이션에서 각 화면, 즉 메뉴에 대응되는 화면에 해당하는 Vue 컴포넌트가 위치
- App.vue : 최상위 Vue 컴포넌트
-
package.json : Vue 프로젝트에 대한 정보 및 사용하고 있는 모듈 등에 대한 정보를 관리하고, Vue 프로젝트를 실행할 수 있는 스크립트가 정의된 파일 (하기 파일 설명 참고)
-
// 프로젝트 정보, 버전 // npm에 등록된다면 공개/비공개 여부 명시 "name": "project01", "version": "0.1.0", "private": true, -
// 명령어 단축 모음 "scripts": { "serve": "vue-cli-service serve", // 프로젝트 구동 "build": "vue-cli-service build", // product를 위한 컴파일 "lint": "vue-cli-service lint" }, -
// build시(운영환경)) 참조해야할 npm 모듈 목록 "dependencies": { "core-js": "^3.8.3", "vue": "^3.2.13" }, -
// 개발시 참조해야할 npm 모듈 목록 // package-lock.json를 다시 참조하고 있음 "devDependencies": { "@babel/core": "^7.12.16", "@babel/eslint-parser": "^7.12.16", "@vue/cli-plugin-babel": "~5.0.0", "@vue/cli-plugin-eslint": "~5.0.0", "@vue/cli-service": "~5.0.0", "eslint": "^7.32.0", "eslint-plugin-vue": "^8.0.3" }, -
// 구문 패턴을 위한 설정 "eslintConfig": { "root": true, "env": { "node": true }, "extends": [ "plugin:vue/vue3-essential", "eslint:recommended" ], "parserOptions": { "parser": "@babel/eslint-parser" }, "rules": {} }, -
// 지원 브라우저 정보
"browserslist": [
  "> 1%", // 사용자수 1% 이상인 것만
  "last 2 versions", // 최근 2개의 버전만 지원
  "not dead",
  "not ie 11" // IE 11 지원하지 않음
]
-
IMPORTANT
실행 구조
Vue 프로젝트 실행 -> main.js 실행 -> App.vue 가져오기 -> public/index.html 에 마운트
- Vue 프로젝트가 실행(npm run serve)이 되면 가장 먼저 main.js를 실행합니다.
- main.js에서 App.vue 컴포넌트로 Vue 앱을 생성합니다.
- main.js 라우터(router), 상태관리(vuex), 믹스인(mixins), 전역 모듈 등을 로드합니다.
- App.vue 에서 네비게이션 처리 및 라우터에 해당하는 컴포넌트를 실행하게 됩니다.
- App.vue 컴포넌트가 public 폴더의 index.html 의 html 요소 중 id가 “app”인 요소에 마운트됩니다.
- Vue Component의 기본 구조
<template>
    <main>
    </main>
</template>
<script>
export default {
    name: 'ComponentName',
    components: {},
    data() {
        return {
            sampleData: '',
        }
    },
    methods: {}
}
</script>
<style scoped>
</style>
- User Snippets 등록
- File > Preference > User Snippets 메뉴 이동
- 검색창에 vue 입력 -> vue 선택
-
아래 코드 입력
-
"Generate Basic Vue Code" : { "prefix": "vue-start", "body": [ "<template>\n\t<div></div>\n</template>\n<script>\nexport default {\n\tcomponents: {},\n\tdata() {\n\t\treturn {\n\t\t\tsampleData: ''\n\t\t}\n\t},\n\tsetup() {},\n\tcreated() {},\n\tmounted() {},\n\tunmounted() {},\n\tmethods: {}\n}\n</script>" ], "description": "Generate Basic Vue Code" }
- eslint, prettier 설정
.prettierrc파일 생성{ "semi": false, "bracketSpacing": true, "singleQuote": true, "useTabs": false, "trailingComma": "none", "printWidth": 80 }
- package.json 파일 열기
"rules": { "space-before-function-paren": "off" }
3. 라우터

- chunk-vendors.js
- 참조한 라이브러리들이 컴파일되는 javascript 파일
IMPORTANT
첫번째 방법 (기본 Import) 무조건 접근하는 페이지의 경우 “
app.js”
- 라우팅할 컴포넌트를 임포트하고
- path, name, component 값을 설정
- 무조건 동일한 파일
import HomeView from '../views/HomeView.vue'

const routes = [
  {
    path: '/',
    name: 'home',
    component: HomeView
  }
]

const router = createRouter({
  history: createWebHistory(process.env.BASE_URL),
  routes
})

export default router
IMPORTANT
두번째 방법 (lazy-loaded without webpackPrefetch) 접속할 확률이 낮거나 사이즈가 작아서 클릭할 때마다 다운로드 받아도 상관 없는 경우 “
about.js”
- 사용할 컴포넌트를 화살표 함수로 정의
- 라우트 별로 파일을 분리(설정,
webpackChunkName: "about")할 수 있다.(빌드시 해쉬코드가 추가됨)- lazy-loaded 된다. 즉 라우트로 컴포넌트 호출시 스태틱 파일을 클라이언트로 내려 받는다
- status = 304, size = ???B로 클라이언트로 다운로드 됨
webPackChunkName이 동일하다면 같은 파일로 간주한다.
const routes = [
  {
    path: '/about',
    name: 'about',
    // route level code-splitting
    // this generates a separate chunk (about.[hash].js) for this route
    // which is lazy-loaded when the route is visited.
    component: () => import(/* webpackChunkName: "about" */ '../views/AboutView.vue')
  }
]
IMPORTANT
세번째 방법 (lazy-loaded with webpackPrefetch) 접속할 확률이 높거나 사이즈가 커서 미리 다운로드 받아야 하는 경우 “
webpackPrefetch:true”
- 2번째 방법에서 “
webpackPrefetch:true” 속성을 추가- status = 200, size = prefetch cache로 당장은 사용할 것이 아니고 앞으로 사용할 것으로 브라우저 캐쉬에 먼저 저장. preload, preconnect의 종료가 더 존재
- prefetch cache된 파일을 클릭하는 순간 서버로부터가 아니가 브라우저의 캐쉬 영역에서 다운로드 함으로 속도가 빠름

// router > index.js
const routes = [
  {
    path: '/about',
    name: 'about',
    // route level code-splitting
    // this generates a separate chunk (about.[hash].js) for this route
    // which is lazy-loaded when the route is visited.
    component: () => import(/* webpackChunkName: "about", webpackPrefetch:true*/ '../views/AboutView.vue')
  }
]

// index.html > <head> 엘리먼트에 자동 추가 됨
<link rel="prefetch" as="script" href="/js/about.js">
4. 데이터바인딩
- 데이터 바인딩
- Data Binding
-
기존의 javascript에서는 데이터를 아래와 같이 ID/Name/Class 속성을 먼저 선언하고 사용했다.
-
document.querySelector("#tbBody").innerHTML = h.join(""); - 하지만, vuejs에서는 아래와 같이 변수와 vue 키워드로 다양하게 바인딩이 가능 하다.
-
- Data Binding
IMPORTANT
Binding
- 문자열 바인딩은
data() 영역에 선언된 데이터 영역의 변수를 html영역에 `` 형태로 바인딩- data() 영역에
html tag가 데이터 변수로 사용되었다면,v-html="html변수명"(v-directive)사용(innterHtml로 바인딩 됨)- html 속성으로
v-model="변수명"을 사용하면two-way binding으로 값이 동시에 변경된다.
- select, input은 value와 양방향 바인딩
- checkbox는 checked와 양방향 바인딩
v-model.number="변수명"과 같이.데이터타입으로 형변환 가능<select v-model="selectedCity">와 같이 select 요소에도v-model로 two-way 바인딩checkbox요소의 경우 반드시arrary 형식과 v-model 연결을 하고 checked 속성과 바인딩 됨radio요소의 경우문자열 형식과 v-model 연결을 함속성에 데이터를 바인딩할때는v-bind로 할당 대신에:로 사용 가능
string,input,select,checkbox,radio,htmlandattributeBinding
<template>
  <!-- string binding -->
  <div>
    <h1>hello </h1>
  </div>

  <!-- input -->
  <br/>
  <input type="text" v-model.number="num3" /> + <input type="text" name="" id="" v-model.number="num4" /> = <span></span>

  <!-- select -->
  <br/>
  <div>
    <select name="" id="" v-model="selectedCity">
      <option value=""></option>
      <option value="02">서울</option>
      <option value="051">부산</option>
      <option value="064">제주</option>
    </select>
  </div>

  <!-- checkbox & radio -->
  <br/>
  <div>
    <div>
      <input type="checkbox" id="html" value="HTML" v-model="checkFavoriteLang" />
      <label for="html">HTML</label>
    </div>
    <div>
      <input type="checkbox" id="js" value="JavaScript" v-model="checkFavoriteLang" />
      <label for="js">JavaScript</label>
    </div>

    <div>선택한 지역은: </div>
  </div>
  <div>
    <div>
      <input type="radio" id="html" value="HTML" v-model="radioFavoriteLang" />
      <label for="html">HTML</label>
    </div>
    <div>
      <input type="radio" id="js" value="JavaScript" v-model="radioFavoriteLang" />
      <label for="js">JavaScript</label>
    </div>

    <div>선택한 지역은: </div>
  </div>

  <!-- html -->
  <br/>
  <div>
    <div></div>
    <div v-html="htmlString"></div>
  </div>

  <!-- attribute -->
  <br/>
  <input type="text" name="" id="" v-bind:value="userId" readonly />
  <input type="text" name="" id="" :value="userId" readonly />
  <br />
  <img v-bind:src="imgSrc" alt="" style="width: 100px; height: auto" />
  <img :src="imgSrc" alt="" style="width: 100px; height: auto" />
  <br />
  <input type="search" name="" id="" v-model="txt1" />
  <button :disabled="txt1 === ''">search</button>
</template>

<script>
export default {
  components: {},
  data() {
    return {
      // string
      userName: 'John Doe',
      // input
      num3: 0,
      num4: 0,
      // select
      selectedCity: '02',
      // checkbox
      checkFavoriteLang: ['js'],
      // radio
      radioFavoriteLang: '',
      // html
      htmlString: '<p style="color:red;">Red Color</p>',
      // attribute
      userId: '',
      imgSrc: 'https://www.vectorlogo.zone/logos/vuejs/vuejs-ar21.svg',
      txt1: '',
    }
  }
}
List(Array)Binding
<template>
  <div>
    <div>
      <select name="" id="">
        <option value=""></option>
        <option v-bind:value="city.code" v-bind:key="city.code" v-for="city in cities"></option>
      </select>
    </div>

    <div>
      <table>
        <thead>
          <tr>
            <th>제품번호</th>
            <th>제품명</th>
            <th>가격</th>
            <th>주문수량</th>
            <th>함계</th>
          </tr>
        </thead>
        <tbody>
          <!-- <tr v-bind:key="i" v-for="(drink, i) in drinkList"></tr> <== 키 값이 없을 경우 -->
          <tr v-bind:key="drink.drinkId" v-for="drink in drinkList">
            <td></td>
            <td></td>
            <td></td>
            <td><input type="number" name="" id="" v-model="drink.qty" /></td>
            <td></td>
          </tr>
        </tbody>
      </table>
    </div>
  </div>
</template>
<script>
export default {
  components: {},
  data() {
    return {
      cities: [
        { title: '서울', code: '02' },
        { title: '부산', code: '051' },
        { title: '제주', code: '064' }
      ],
      drinkList: [
        { drinkId: '1', drinkName: '코카콜라', price: 700, qty: 3 },
        { drinkId: '2', drinkName: '오렌지주스', price: 900, qty: 10 },
        { drinkId: '3', drinkName: '사이다', price: 700, qty: 8 },
        { drinkId: '4', drinkName: '옥수수차', price: 1200, qty: 7 },
        { drinkId: '5', drinkName: '환타', price: 500, qty: 4 }
      ]
    }
  }
}
</script>
Class(for style)Binding
<template>
  <div>
    <!-- class binding : true, false -->
    <div v-bind:class="{ 'text-red': true }">class binding</div>
    <div v-bind:class="{ 'text-red': false }">class binding</div>
    <div v-bind:class="{ 'text-red': hasError, active: isActive }">class binding</div>

    <!-- class binding : array -->
    <div v-bind:class="class2">클래스 바인딩</div>
  </div>
</template>
<script>
export default {
  components: {},
  data() {
    return {
      isActive: false,
      hasError: false,
      class2: ['isActive', 'hasError']
    }
  },
  setup() {},
  created() {},
  mounted() {},
  unmounted() {},
  methods: {}
}
</script>

<style scoped>
.active {
  background-color: greenyellow;
  font-weight: bold;
}
.text-red {
  color: red;
}
</style>
StyleBinding
<template>
  <div style="color: red; font-size: 30px">style binding 글씨 : red; 폰트크기 : 30px</div>
  <!-- 스타일은 키:값 형태임으로 object 형식으로 바인딩 가능 -->
  <div v-bind:style="style1">style binding 글씨 : green; 폰트크기 : 30px</div>

  <button v-on:click="style1.color = 'blue'">색상바꾸기</button>
</template>
<script>
export default {
  components: {},
  data() {
    return {
      style1: {
        color: 'green',
        fontSize: '30px'
      }
    }
  }
}
</script>
5. 이벤트
- 이벤트
- Event
-
on+event에서 on대신 @붙여
@click=”func name” 또는v-on:click=”function name” 형식으로 사용 -
<button onclick="clickFunciton();">click</button>
<script>
  fuction clickFunction() {
    alert("click");
  }
</script>

<button v-on:click="increaseCounter1">click 1</button>
<button @click="increaseCounter2">click 2</button>
-
- Event
IMPORTANT
Event
@나v-onprefix를 사용하여 이벤트 리스너를 등록- 함수로 event를 인자를 전달하기 위해서는 functionName(
@event)로 리스너를 등록해야 한다.- key event로
@keyup.enter와 같이keyup.으로 키 값을 즉시 알 수 있음
- .enter, .tab, .delete, .esc, .space, .up, .down, .left, .right, .stop - event.stopPropagation(), .prevent - event.preventDefault();
<template>
  <!-- event -->
  <div>
    <select name="" id="" v-on:change="changeCity($event)" v-model="selectedCity">
      <option value="">==도시선택==</option>
      <option v-bind:value="city.cityCode" v-bind:key="city.cityCode" v-for="city in cityList"></option>
    </select>
  </div>
  <div>
    <select name="" id="">
      <option v-bind:value="dong.dongCode" v-bind:key="dong.dongCode" v-for="dong in selectedDongList"></option>
    </select>
  </div>

  <!-- key event -->
  <div>
    <input type="search" name="" id="" v-on:keyup="checkEnter($event)" v-model="searchText" />
    <input type="search" name="" id="" v-on:keyup.enter="doSearch" v-model="searchText" />
  </div>
  <button @click="doSearch">조회</button>
  <button type="submit" @click.prevent="doSearch">prevent</button>
</template>
<script>
export default {
  components: {},
  data() {
    return {
      selectedCity: '',
      cityList: [
        { cityCode: '02', title: '서울' },
        { cityCode: '051', title: '부산' },
        { cityCode: '064', title: '제주' }
      ],
      dongList: [
        { cityCode: '02', dongCode: '1', dongTitle: '서울 1동' },
        { cityCode: '02', dongCode: '2', dongTitle: '서울 2동' },
        { cityCode: '051', dongCode: '1', dongTitle: '부산 1동' },
        { cityCode: '051', dongCode: '2', dongTitle: '부산 2동' },
        { cityCode: '051', dongCode: '3', dongTitle: '부산 3동' },
        { cityCode: '064', dongCode: '1', dongTitle: '제주 1동' },
        { cityCode: '064', dongCode: '2', dongTitle: '제주 2동' }
      ],
      selectedDongList: [],
      searchText: ''
    }
  },
  methods: {
    changeCity(event) {
      console.log(event.target.tagName)
      console.log(this.selectedCity)
      this.selectedDongList = this.dongList.filter((dong) => dong.cityCode === this.selectedCity)
      console.log(this.selectedDongList)
    },
    doSearch() {
      console.log(this.searchText)
    },
    checkEnter(event) {
      if (event.keyCode === 13) {
        this.doSearch()
      }
    }
  }
}
</script>
6. 렌더링
- 화면에 나타나기 또는 숨기기 위해서 기존의 javaScript에서는 다음과 같은 코드를 사용 했다.
<button id="btnDelete" onclick="doDelete();" disabled>삭제</button>
<script>
  document.querySelector("#btnDelete").disabled = false;
</script>
- vue.js에서는
v-if, v-else-if, v-else또는v-show키워드로 대처 가능 하다.
IMPORTANT
v-if, v-else-if, v-else는 vue.js에서 사용하는 조건문으로 아래의 코드와 같이 조건문별 컨트롤 배치 가능
v-show는style="display: none"속성을 사용
<template>
  <div>
    <!-- v-if, v-else-if, v-else 키워드 사용 -->
    <div v-if="userRole === 'G'">
      <button>조회</button>
    </div>
    <div v-else-if="userRole === 'M'">
      <button>조회</button>
      <button>생성</button>
    </div>
    <div v-else>
      <button>조회</button>
      <button>생성</button>
      <button>삭제</button>
    </div>
    <div>
      <button v-if="userRole === 'A' || userRole === 'M' || userRole === 'G'">조회</button>
      <button v-if="userRole === 'A' || userRole === 'M'">생성</button>
      <button v-if="userRole === 'A'">생성</button>
    </div>
    <br />
    <!-- v-show 키워드 사용 -->
    <input type="radio" name="" id="ai" value="AI" v-model="favoriteField" />
    <label for="ai">인공지능</label>
    <input type="radio" name="" id="blockchain" value="BC" v-model="favoriteField" />
    <label for="blockchain">블럭체인</label>
    <input type="radio" name="" id="iot" value="IOT" v-model="favoriteField" />
    <label for="iot">사물인터넷</label>
    <input type="radio" name="" id="other" value="OTH" v-model="favoriteField" />
    <label for="other">기타</label>
    <div v-show="favoriteField === 'OTH'">
      <input type="text" name="" id="" />
    </div>
  </div>
</template>
<script>
export default {
  components: {},
  data() {
    return {
      userRole: 'M', // A(admin), M(manager), G(general)
      favoriteField: ''
    }
  }
}
</script>
7. computed, watch
- vue.js에서는 computed와, watch 속성을 통하여 모듈내 데이터의 변환에 대해서 대처할 수 있다.
IMPORTANT
computed
- 해당 vue instance내에 정의된 데이터 값과 연관된 또다른 데이터를 정의해서 사용 가능
- 함수이자 vue instance내의 또다른 데이터 이다.
- 동일한 데이터가 모듈내 여러곳에서 사용될 경우 유용하다.
IMPORTANT
watch
- vue instance에 정의된 데이터 값이 변경이 일어나는지 감시하고 변경시 지정된 함수 실행
- watch에 정의된 하나의 데이터 값만 감시한다. data의 이름과 동일해야 한다.
- watch하는 하나의 데이터의 값이 변경되기 전에는 실행되지 않는다.
<template>
  <!-- computed -->
  <div>
    <input type="text" name="" id="" v-model="firstName" />
    <input type="text" name="" id="" v-model="lastName" />
  </div>
  <h1></h1>
  <br />
  <label>---------------------------------------------------</label>
  <br />
  <div>
    <label for="age">당신의 나이는?</label>
    <input type="number" name="" id="age" v-model="age" />
  </div>
  <p></p>
  <p></p>
  <br /><br />

  <!-- watch -->
  <div>
    <select name="" id="" v-model="selected">
      <option value="A">A</option>
      <option value="B">B</option>
      <option value="C">C</option>
    </select>
    <button v-on:click="displayHistory($event)">show history</button>
  </div>
</template>
<script>
export default {
  components: {},
  data() {
    return {
      // for computed
      firstName: 'John',
      lastName: 'Doe',
      title: 'Mr.',
      age: 0,
      // for watch
      fullName: '',
      selected: '',
      changeHistory: []
    }
  },
  computed: {
    getfullName() {
      let returnName = this.title + ' ' + this.firstName + ', ' + this.lastName
      returnName = returnName + '.'
      return returnName
    },
    isAdult() {
      let returnStr = null
      returnStr = this.age >= 20 ? '성인' : '미성년자'
      return returnStr
    }
  },
  watch: {
    firstName(newValue, oldValue) {
      console.log(oldValue)
      console.log(newValue)
      this.fullName = this.title + ' ' + this.firstName + ', ' + this.lastName
    },
    lastName(newValue, oldValue) {
      console.log(oldValue)
      console.log(newValue)
      this.fullName = this.title + ' ' + this.firstName + ', ' + this.lastName
    },
    selected(newValue, oldValue) {
      console.log(`watch(selected-newValue) : ${newValue}`)
      console.log(`watch(selected-oldValue) : ${oldValue}`)
      this.changeHistory.push(`${oldValue} -> ${newValue}`)
    }
  },
  methods: {
    displayHistory(event) {
      console.log(this.changeHistory)
    }
  }
}
</script>
8. lifecycle hook
- vue 인스턴스가 생성되고 파괴될때까지의 라이프 사이클은 다음의 이미지에 잘 나타나 있다.

IMPORTANT
Vue LifeCycle
- vue instance가 생성되고 나서 호출되는
created=> 데이터의 초기화- DOM에 부착되고 나서 호출되는
mounted=> UI에 Display 되는 함수 관련- DOM의 내용이 변경되고나서 호출되는
update- component가 부착해지되고나서 호출되는
unmounted=> 데이터의 초기화 SPA임을 주의 요망- 인스턴스가 없어질때 호출되는
destroyed
<template>
  <div>
    <div></div>
    <div>
      <label for="">태어난 도시는?</label>
      <select name="" id="">
        <option value="" :key="city.code" v-for="city in cities">

        </option>
      </select>
    </div>
  </div>
</template>
<script>
export default {
  components: {},
  data() {
    return {
      sampleData: '',
      cities: [],
      fnInterval: null
    }
  }

  // data(), watch, computed, methods 정보의 준비가 끝난 상태
  created() {
    this.getCityList()
  },

  // 실제 DOM이 랜더링이 끝난 상태
  mounted() {
    this.fnInterval = window.setInterval(() => {
      console.log('aaaa')
    }, 1000)
  },

  // DOM이 업데이트 된 후에 호출
  updated() {},

  // 현재 컴포넌트를 빠져 나갈 때
  unmounted() {
    window.clearInterval(this.fnInterval)
    this.fnInterval = null
    this.cities = null
  },

  methods: {
    getCityList() {
      // 서버에 도시 목록을 요청, 가져오는데 시간이 소요
      this.cities = [{ code: '02', title: '서울' }]
    }
  }
}
</script>
9. component
- Vuejs에서는 모든 화면은 Component 개념으로 만들어 사용되며, 이러한 Component의 사용(참조) 및 데이터 전달 방법에 다음과 같은 방법이 존재
IMPORTANT
Component 정의 및 참조 사용 방법(참조할 vue page에서 import 또는 main.js에서 Global 사용)
- main.js : import 후
app.component('page-title', PageTitle)형식으로 Global 정의 후 전역으로 사용- parent.vue : import 후
Component 영역에 선언 후 사용
IMPORTANT
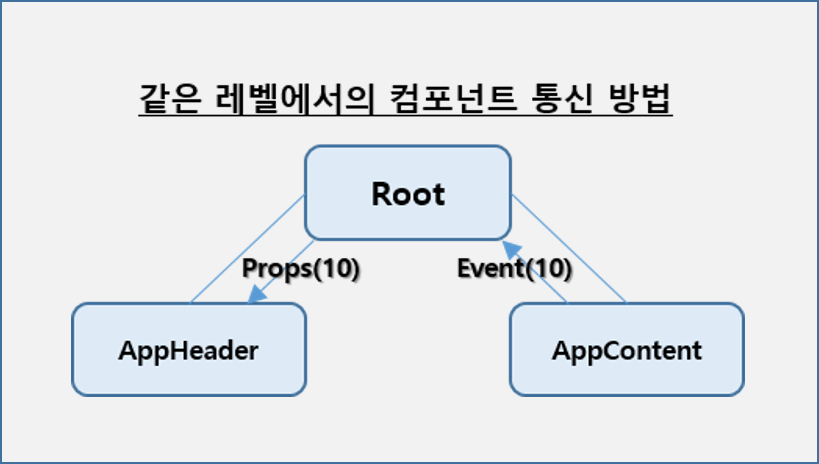
parent ↔ component 데이터 전달 방법(props, emit)
props는Component에서 Props 영역에 정의한 데이터를Parent에서 Component 객체에 속성으로 접근 가능emit은Component에서 $emit 키워드로Parent의 이벤트 리스너를 호출하여 접근
IMPORTANT
parent → component 리소스 접근 방법(ref)
parent에 선언된 component의 속성에 ref를 정의하고this.$refs.정의한 Component이름.Component 자원으로 접근
-
Component 정의 및 참조(사용) 방법
-
<!-- 참조하는 vue page --> <template> <div><ChildComponent/></div> </template> <script> import ChildComponent from '@/components/fragments/ChildComponent.vue' export default { components: { ChildComponent }, } </script> -
<script>
<!-- main.js -->
import PageTitle from './components/fragments/PageTitle.vue'

const app = createApp(App)
app.use(store)
app.use(router)
app.component('page-title', PageTitle)
app.mount('#app')
</script>

<!-- 일반 페이지에서는 'page-title 글로벌 component name으로 사용' -->
<template>
  <div class="container">
    <page-title title="고객목록" />
    <h3 style="border-left: 5px solid red; padding-left: 3px; text-align: left">고객목록</h3>
    <button class="btn btn-danger">클릭</button>
  </div>
</template>
-
- parent ↔ component 데이터 전달 방법
-
Parent → Child 전달(Props)
-
<!-- parent --> <template> <div> <ChildComponent :str="propsStr" v-bind:num="propsNum" :isOK="propsIsOK" :arr="propsArr" v-bind:obj="propsObj" /> </div> </template> <script> import ChildComponent from '@/components/fragments/ChildComponent.vue' // 사용할 component import export default { components: { ChildComponent // component 선언 }, data() { return { sampleData: '', propsStr: '자식으로 전달하는 문자열', propsNum: 34, propsIsOK: true, propsArr: [1, 2, 3, 4, 5], propsObj: { name: 'Jeremy' } } } } </script> -
<!-- child component --> <template> <div> <p>str : </p> <p>num : </p> <p>isOK : </p> <p>arr : </p> <p>obj : </p> </div> </template> <script> export default { props: { str: { type: String, default: '' }, num: { type: Number, default: 0 }, isOK: { type: Boolean, default: false }, arr: { type: Array, default: function () { return [] } }, obj: { type: Object, default: function () { return {} } } }, components: {}, data() { return { sampleData: '' } } } </script> -
Child → Parent 전달(Emit)
-
<!-- child component : 부모의 이벤트 리스너 호출하여 접근 --> <template> <div> <p>arr : </p> <div> <select name="" id="" v-on:change="callParent" v-model="selectedValue"> <option v-bind:value="num" v-bind:key="num" v-for="num in arr"></option> </select> </div> </div> </template> <script> export default { props: { arr: { type: Array, default: function () { return [] } } }, data() { return { selectedValue: 0 } }, methods: { callParent() { this.$emit('changeNum', this.selectedValue) } } } </script> -
<!-- 이벤트 리스너를 통하여 접근 -->
<template>
  <div>
    <ChildComponent :arr="propsArr" v-bind:obj="propsObj" v-on:changeNum="getData"/>
  </div>
</template>
<script>
import ChildComponent from '@/components/fragments/ChildComponent.vue'

export default {
  components: {
    ChildComponent
  },
  data() {
    return {
      propsArr: [1, 2, 3, 4, 5],
    }
  },
  methods: {
    getData(data) {
      console.log('called from child component and value : ' + data)
      // output : called from child component and value : 1
      // output : called from child component and value : 2
    }
  }
}
</script>
-
-
parent → component 리소스 접근 방법
-
<!-- parent에 component의 ref 속성 정의 및 $refs로 접근 --> <template> <div> <ChildComponent v-bind:obj="propsObj" ref="refChildComponent" /> <button v-on:click="changeChildValue">child refer</button> </div> </template> <script> import ChildComponent from '@/components/fragments/ChildComponent.vue' export default { components: { ChildComponent }, data() { return { propsObj: { name: 'Jeremy' } } }, methods: { changeChildValue() { this.$refs.refChildComponent.str2 = 'i love seoul.' this.$refs.refChildComponent.printConsoleLog() } } } </script> -
<!-- child component의 접근되는 자원 정의 -->
<template>
  <div>
    <p>obj : </p>
    <br />
    <h1></h1>
  </div>
</template>
<script>
export default {
  props: {
    obj: { type: Object, default: function () { return {} } }
  },
  components: {},
  data() {
    return {
      str2: 'this is child component label : i love busan.'
    }
  },
  methods: {
    printConsoleLog() {
      console.log('component specific method.')
    }
  }
}
</script>
-
- Parent Child 조건에서의 데이터 전달 개념도

- 동일한 레벨에서의 Component간의 데이터 전달 방법
- parent ↔ component 데이터 전달 샘플 코드

10. bootstrap
- Vuejs에서 Bootstrap을 적용하는 방법
IMPORTANT
bootstrap install
import the CDN 파일
사용 샘플
- bootstrap 최신 버전 설치
npm install bootstrap
- main.js에 CDN 추가
import 'bootstrap/dist/css/bootstrap.min.css'
// import 'bootstrap/dist/js/bootstrap.min.js'
//import 'bootstrap/dist/js/bootstrap.bundle'
import 'bootstrap'
// 오류 발생시 하기 명령어 터미널에서 실행
// npm install --save @popperjs/core
- 사용 샘플
<template>
  <div class="container">
    <page-title
      title="this is PageView."
      class="text-left ps-2"
      style="border-left: 3px solid red"
    ></page-title>
    <button class="btn btn-danger">click</button>
  </div>
</template>
11. SimpleGrid
- 기본 그리드의 패턴에 대해서 Component화 한 그리드 패턴 샘플
IMPORTANT
- Component 화로 Parent ↔ Child(Component)로 props 속성과 $emit(이벤트 호출) 키워드 사용
- 0번째 Index에 checkbox나 radio를 사용
<!-- View Page -->
<template>
  <div class="container">
    <button class="btn btn-primary me-1" @click="doSearch">조회</button>
    <button class="btn btn-danger" @click="doDelete">삭제</button>

    <simple-grid :headers="headers" :items="drinkList" :selectType="selectType"
      checkedKey="drinkId" checkedEventName="change-item2" @change-item2="changeCheckedValue"
    />
  </div>
</template>
<script>
import SimpleGrid from '@/components/fragments/SimpleGrid.vue'

export default {
  components: { SimpleGrid },
  data() {
    return {
      selectType: 'checkbox',
      sampleData: '',
      headers: [
        { title: '제품코드', key: 'drinkId' },
        { title: '제품명', key: 'drinkName' },
        { title: '제품가격', key: 'price' }
      ],
      drinkList: [],
      checkedItems: [],
      checkedItem: ''
    }
  },
  methods: {
    doSearch() {
      this.drinkList = [
        { drinkId: '1', drinkName: '코카콜라', price: 700, qty: 1 },
        { drinkId: '2', drinkName: '오렌지주스', price: 1200, qty: 1 },
        { drinkId: '3', drinkName: '커피', price: 500, qty: 1 },
        { drinkId: '4', drinkName: '물', price: 700, qty: 1 },
        { drinkId: '5', drinkName: '보리차', price: 1200, qty: 1 },
        { drinkId: '6', drinkName: '포카리', price: 1000, qty: 1 },
        { drinkId: '7', drinkName: '뽀로로', price: 1300, qty: 1 }
      ]
    },
    doDelete() {
      // 삭제 실행 - 삭제할 아이템에 대한 제품번호는 this.checkedItems
    },
    changeCheckedValue(data) {
      console.log('선택된 아이템', data)
      if (this.selectType === 'checkbox') {
        this.checkedItems = data
      } else if (this.selectType === 'radio') {
        this.checkedItem = data
      }
    }
  }
}
</script>
<!-- Component -->
<template>
  <table class="table table-bordered table-striped">
    <thead>
      <tr>
        <th v-if="selectType === 'checkbox'">
          <input type="checkbox" class="form-check-input" @change="checkAll($event)"/>
        </th>
        <th v-else-if="selectType === 'radio'"></th>
        <th :key="th.key" v-for="th in headers"></th>
      </tr>
    </thead>
    <tbody>
      <tr :key="i" v-for="(item, i) in items">
        <td v-if="selectType === 'checkbox'">
          <input type="checkbox" class="form-check-input" :value="item[checkedKey]" v-model="checkedItems" @change="doChecked"/>
        </td>
        <td v-else-if="selectType === 'radio'">
          <input type="radio" class="form-check-input" :value="item[checkedKey]" v-model="checkedItem" @change="doChecked"/>
        </td>
        <td :key="th.key" v-for="th in headers"></td>
      </tr>
    </tbody>
  </table>
</template>
<script>
export default {
  components: {},
  props: {
    items: { type: Array, default: function () { return [] } },
    headers: { type: Array, default: function () { return [] } },
    selectType: { type: String, default: '' },
    checkedKey: { type: String, default: '' },
    checkedEventName: { type: String, default: 'change-item' }
  },
  data() {
    return {
      checkedItems: [],
      checkedItem: ''
    }
  },
  methods: {
    doChecked() {
      //   console.log(this.checkedItems)
      //   this.$emit('change-item', this.checkedItems)
      if (this.selectType === 'checkbox') {
        this.$emit(this.checkedEventName, this.checkedItems)
      } else if (this.selectType === 'radio') {
        this.$emit(this.checkedEventName, this.checkedItem)
      }
    },
    checkAll(event) {
      // console.log(event.target.checked)
      const checkedItems = []
      if (event.target.checked) {
        this.items.forEach((item) => {
          checkedItems.push(item[this.checkedKey])
        })
      }

      this.checkedItems = checkedItems
      // console.log(this.checkedItems)
    }
  }
}
</script>
12. Slot
- Slot은 Component의 재사용성을 높이는 방법으로 마크업(Markup)을 확장 또는 재정의 할 수 있음


IMPORTANT
named slot은 명시적으로 name 속성을 사용하여 여러개 사용 가능
<!-- https://getbootstrap.com/docs/5.2/components/modal/#static-backdrop -->
<template>
  <div class="modal fade" :id="modalId" data-bs-backdrop="static" data-bs-keyboard="false"
    tabindex="-1" :aria-labelledby="`${modalId}Label`" aria-hidden="true">
    <div class="modal-dialog">
      <div class="modal-content">
        <div class="modal-header">
          <h5 class="modal-title" :id="`${modalId}Label`">
            <slot name="title"></slot>
          </h5>
          <button type="button" class="btn-close" data-bs-dismiss="modal" aria-label="Close"></button>
        </div>
        <div class="modal-body">
          <slot name="body"></slot>
        </div>
        <div class="modal-footer">
          <slot name="footer"></slot>
        </div>
      </div>
    </div>
  </div>
</template>
<script>
export default {
  components: {},
  props: {
    modalId: {
      type: String,
      default: 'myModal'
    }
  },
  data() {
    return {
      sampleData: ''
    }
  }
}
</script>
<template>
  <div>
    <button class="btn btn-primary" data-bs-toggle="modal" data-bs-target="#userModal">
      Show Modal
    </button>
    <button class="btn btn-primary" data-bs-toggle="modal" data-bs-target="#userModal2">
      Show Modal2
    </button>

    <slot-modal modalId="userModal">
      <template v-slot:title>모달창 타이틀</template>
      <template v-slot:body>
        <div class="row gy-2">
          <div class="col-3">
            <label for="" class="form-label">이메일주소</label>
          </div>
          <div class="col-9">
            <input type="email" class="form-control" />
          </div>
        </div>
      </template>
      <template v-slot:footer>
        <button type="button" class="btn btn-secondary" data-bs-dismiss="modal">닫기</button>
        <button type="button" class="btn btn-primary">저장</button>
      </template>
    </slot-modal>

    <slot-modal modalId="userModal2">
      <template v-slot:title>모달창 타이틀2</template>
      <template v-slot:body>
        <div class="row gy-2">
          <p>문장1</p>
          <p>문장2</p>
        </div>
      </template>
      <template v-slot:footer>
        <button type="button" class="btn btn-secondary" data-bs-dismiss="modal">닫기</button>
        <button type="button" class="btn btn-primary">저장</button>
      </template>
    </slot-modal>
  </div>
</template>
<script>
import SlotModal from '@/components/fragments/SlotModal.vue'
export default {
  components: { SlotModal },
  data() {
    return {
      sampleData: ''
    }
  }
}
</script>
13. Layout Component
- Component를 활용하여 Main UI의 layout을 분리할 수 있다.
IMPORTANT
component의 이름은 반드시 2단어 이상으로 만들어야 한다.
App.vue에서 나누기 위한 Component를 배치 시키고 Contents 영역에<router-view/>태그를 정의한다.Header Component와Footer Component를 정의한다.
<!-- App.vue에서 전체 Layout를 설정하고 각 Component를 배치 시킨다. -->
<template>
<header-layout />
<div class="container">
<router-view />
</div>
<footer-layout />
</template>
<script>
import HeaderLayout from '@/components/layouts/HeaderLayout.vue'
import FooterLayout from '@/components/layouts/FooterLayout.vue'
export default {
components: { HeaderLayout, FooterLayout }
}
</script>
<!-- Header Component > HeaderLayout.vue -->
<template>
<nav class="navbar navbar-expand-lg navbar-dark bg-dark">
<div class="container-fluid">
<a class="navbar-brand" @click="goToMenu('/')">개발자의품격</a>
<button class="navbar-toggler" type="button" data-bs-toggle="collapse" data-bs-target="#navbarSupportedContent" aria-controls="navbarSupportedContent" aria-expanded="false" aria-label="Toggle navigation">
<span class="navbar-toggler-icon"></span>
</button>
<div class="collapse navbar-collapse" id="navbarSupportedContent">
<ul class="navbar-nav me-auto mb-2 mb-lg-0">
<li class="nav-item">
<a class="nav-link" :class="{ active: $route.path === '/' }" aria-current="page" @click="goToMenu('/')">Home</a>
</li>
<li class="nav-item">
<a class="nav-link" @click="goToMenu('/about')">About</a>
</li>
<li class="nav-item">
<a class="nav-link" @click="goToMenu('/databinding/string')">String</a>
</li>
<li class="nav-item">
<a class="nav-link" @click="goToMenu('/databinding/html')">Html</a>
</li>
</ul>
<form class="d-flex" role="search">
<input class="form-control me-2" type="search" placeholder="Search" aria-label="Search" />
<button class="btn btn-outline-success" type="submit">Search</button>
</form>
</div>
</div>
</nav>
</template>
<script>
export default {
methods: {
goToMenu(path) {
this.$router.push({ path: path })
}
}
}
</script>
<style>
.navbar-toggler-icon {
background-image: url("data:image/svg+xml;charset=utf8,%3Csvg viewBox='0 0 32 32' xmlns='http://www.w3.org/2000/svg'%3E%3Cpath stroke='rgba(128, 0, 0, 1)' stroke-width='2' stroke-linecap='round' stroke-miterlimit='10' d='M4 8h24M4 16h24M4 24h24'/%3E%3C/svg%3E") !important;
}
</style>
<!-- Footer Component > FooterLayout.vue -->
<template>
<div class="containter">
<footer class="d-flex flex-wrap justify-content-between align-items-center py-3 my-4 border-top">
<div class="col-md-4 d-flex align-items-center">
<span class="mb-3 mb-md-0 text-muted">© 2022 Company, Inc</span>
</div>
</footer>
</div>
</template>
<script>
export default {
}
</script>
14. provide, inject
- 1단계의 부모-자식 관계의 데이터 전달의 경우가 아닌, 2단계 이상의 경우 provide, inject 키워드를 사용하여 보다 쉽게 데이터 전달 가능
IMPORTANT
Component의 세분화에 따라 Parent Child 간의 데이터 전송에 Props와 Emit을 사용하면 효율성이 떨어짐으로 provide, inject 키워드로 손쉽게 사용 가능
- provide 제공, inject 주입
- 일반 Application보다는 Component 에서 사용을 권장
-
일반적인 데이터 전송은 props, emit 사용

-
component간 복잡한 단계의 경우 provide, inject 사용

<!-- provide view -->
<template>
  <div>
    <provide-inject />
  </div>
</template>
<script>
import ProvideInject from '@/components/fragments/ProvideInject.vue'

export default {
  components: { ProvideInject },
  provide() {
    return {
      size: 5,
      str: this.sampleData,
      obj: this.objData
    }
  },
  data() {
    return {
      sampleData: 'AAAAAAA',
      objData: [
        { id: 1, name: 'John', age: 23 },
        { id: 2, name: 'Doe', age: 18 },
        { id: 3, name: 'Walter', age: 32 },
        { id: 4, name: 'Pitter', age: 42 }
      ]
    }
  }
}
</script>

<!-- inject component -->
<template>
  <div>
    <p></p>
    <p></p>
    <p></p>
  </div>
</template>
<script>
export default {
  components: {},
  inject: ['size', 'str', 'obj']
}
</script>
Leave a comment