
Node.js
- 1. Node.js
- 2. Node.js 란?
- 4. 내장 모듈
- 5. Express
- 6. My SQL 연동
- 7. Express 라우터
- 8. 정적 파일 처리
- 9. 파일 업로드(Multer)
- 10. 엑셀 업로드 및 파싱
- 11. HTTP 응답 로그 관리
- 12. 개발자 로그 관리
- 13. Email 발송
- 14 파일 다운로드
- 15. Express 로그인 세션
- 16. 작업 스케줄 / 결과 메일 송부
- 17. 크롤링(인프런, 잡코리아)
- 18. Excel
- 19. CORS
- 20. Sequelize
- 21. MongoDB \& Mongoose
- 22. WebSocket
- 23. forever
- 24. Cluster
- 25. pm2
- 26. API Server Configuration
- 27. Useful Node Modules
- 참고
1. Node.js
![]()
2. Node.js 란?
- Node.js 위키백과
V8으로 빌드된 이벤트 기반 자바스크립트 런타임이다. 웹 서버와 같이 확장성 있는 네트워크 프로그램 제작을 위해 고안되었다.
IMPORTANT
프로그램언어가 아니라 자바스크립트를 실행하는 환경
- “node.js는 chrome v8 자바스크립크 엔진으로 빌드된 자바스크립트 런타임입니다”
- node.js 때문에 javascript 밖으로 나왓다
- 자바스크립트는 블로킹(blocking) 방식의 언어이라 node.js도 블로킹(blocking) IO 방식이다. 하지만 논블러킹(non blocking)으로 비동기 방식도 지원한다.
- node.js의 특징은 싱글 스레드이고 이다. 하지만 이러한 약점을 극복하기위해 논블로킹 사용
- 또다른 특징은 이벤트 루프(libuv)를 통하여 논블러킹을 지원하고 처리할 함수 목록을 스케줄링 한다
-
node 초기화 및 package.json 파일 생성 방법
-
npm init

D:\GitHub\web\web\bootcamp5_study\node>npm init
package name: (node) node_study
version: (1.0.0)
description: desc.
entry point: (01_helloworld.js)
test command:
git repository:
keywords:
author:
license: (ISC)
About to write to D:\GitHub\web\web\bootcamp5_study\node\package.json:

{
  "name": "node_study",
  "version": "1.0.0",
  "description": "desc.",
  "main": "01_helloworld.js",
  "scripts": {
    "test": "echo \"Error: no test specified\" && exit 1"
  },
  "author": "",
  "license": "ISC"
}

Is this OK? (yes) yes
-
-
Express 설치 방법
-
npm install express

D:\GitHub\web\web\bootcamp5_study\node>npm install express

added 57 packages, and audited 58 packages in 4s
7 packages are looking for funding
  run `npm fund` for details
found 0 vulnerabilities
3. 자바스크립트 실행 및 모듈
- Javascript 코드를 빌드하고 실행
IMPORTANT
node패키지 명령어를 통하여 cli 관경에서 Javascript 코드 실행
node 01_helloworld와 같이 node 패키지를 사용하여 cli 환경에서 실행 가능module.export = {}의 형식으로 export하기 위한 함수 정의- export 된 함수를
const { xx, yy } = require()함수를 사용하여 import하여 사용- 02_calculator.js - Github SourceCode
- 03_module.js - Github SourceCode
// 02_calculator.js
function add(n1, n2) {
  return n1 + n2;
}

function minus(n1, n2) {
  return n1 - n2;
}

function mul(n1, n2) {
  return n1 * n2;
}

function divide(n1, n2) {
  return n1 / n2;
}

const defaultNum = 1;

module.exports = {
  add,
  minus,
  mul,
  divide,
  defaultNum,
};

// 03_module.js
const { add, minus, defaultNum } = require("./02_calculator");

console.log(add(7, 2));
console.log(minus(7, 2));
console.log(defaultNum);
4. 내장 모듈
- console, timer, process, path, url, crypto, fs
IMPORTANT
- 전역 객체임으로 별도의 import 없이 사용가능
- console.log, console.log(new Exception(“error”)) // 단순 로그
- console.error // 에러 로그
- console.table(arr) // 테이블 형태의 로그
- console.dir(obj, {depth:1, color:true}) // 객체 깊이별로 확인
- console.time(“동일한 레이블”) ~~ console.timeEnd(“동일한 레이블”) // 함수의 시간 소요 확인
- 04_console.js - Github SourceCode
const fs = require("fs"); // filesystem
const { Console } = require("console");

const output = fs.createWriteStream("./stdout.log");
const errorOutput = fs.createWriteStream("./stderr.log");

const logger = new Console({ stdout: output, stderr: errorOutput });
const count = 5;
logger.log("count: %d", count);
logger.error("count: " + count);

console.log("Hello World");
const world = "world";
console.log(`hello ${world}`);

console.error("에러 메시지 출력");
console.error(new Error("에러 메시지 출력"));

const arr = [
  { name: "John Doe", email: "john@gmail.com" },
  { name: "Jane Doe", email: "jane@gmail.com" },
];

console.log(arr);
console.table(arr);

const obj = {
  students: {
    grade1: { class1: {}, class2: {} },
    grade2: { class1: {}, class2: {} },
    teachers: ["John Doe", "Jane Doe"],
  },
};

console.log(obj);

console.dir(obj, { depth: 1, color: true });

console.time("func 1");
for (let i = 0; i < 999999; i++) {
  // 특정 코드
}
console.timeEnd("func 1");
IMPORTANT
- 전역 객체임으로 별도의 import 없이 사용가능
- setTimeout() // 밀리세컨트 이 후 한번 실행
- setInterval(), clearInterval() // 밀리세컨트 이 후 반복해서 실행
- setImmediate() // 시간없이 callback 함수만 작성, 이 후 모든 코드 먼저 실행 후 실행 됨
- 05_timers.js - Github SourceCode
const timeout = setTimeout(() => {
  console.log("1초 후에 실행됩니다.");
}, 1000);

const interval = setInterval(() => {
  console.log("1초 마다 실행이 됩니다.");
}, 1000);

setTimeout(() => {
  clearInterval(interval);
}, 3000);

const immediate = setImmediate(() => {
  console.log(
    "setImmediate() 함수 호출 뒤에 오는 모든 코드를 먼저 실행하고 바로 다음에 실행이 됩니다."
  );
});

console.log("setImmediate 보다 먼저 실행 됩니다.");
IMPORTANT
- 전역 객체가 아님으로 require로 import 후 사용 가능
- 특정 이벤트 발생시 마다 이벤트 캐취를 위한 리스너 등록 후 사용 가능
- 06_process.js - Github SourceCode
const process = require("process");

console.log(process.env);

process.on("beforeExit", (code) => {
  console.log("beforeExit 이벤트 리스너", code);
});

process.on("exit", (code) => {
  console.log("exit 이벤트 리스너", code);
});

console.log("1. 콘솔에 출력되는 첫 번째 메시지");
console.log("2. 콘솔에 출력되는 두 번째 메시지");
IMPORTANT
- 전역 객체가 아님으로 require로 import 후 사용 가능
- 운영체제의 정보 확인
- 07_os.js - Github SourceCode
const os = require("os");

console.log(os.arch()); // CPU 아키텍쳐
console.log(os.cpus()); // CPU 코어 정보
console.log(os.hostname()); // 운영체제 호스트명
console.log(os.type()); // 운영체제 타입
console.log(os.tmpdir()); // 임시 파일 저장 경로
IMPORTANT
- 전역 객체가 아님으로 require로 import 후 사용 가능
- 경로에 대한 전반적인 정보
- 08_path.js - Github SourceCode
const path = require("path");

console.log(__dirname); // 현재 실행되고 있는 파일의 디렉토리 경로
console.log(__filename); // 현재 실행되고 있는 파일의 경로

console.log(path.basename(__filename)); // 경로의 마지막 부분
console.log(path.basename(__filename, ".js")); // 경로의 마지막 부분에서 확장자를 제거한 이름

console.log(path.dirname(__filename)); // 파일의 디렉토리 경로
console.log(path.dirname("dir1/dir2/dir3/file.js"));

console.log(path.extname(__filename)); // 파일의 확장자

console.log(path.parse("/home/user/dir/file.txt"));
const path1 = path.parse("/home/user/dir/file.txt");
console.log(path1.name);
// {
//     root: '/',
//     dir: '/home/user/dir',
//     base: 'file.txt',
//     ext: '.txt',
//     name: 'file'
//   }

const path2 = path.format({
  root: "/",
  dir: "/home/user/dir",
  base: "file.txt",
  ext: ".txt",
  name: "file",
});

console.log(path2);
console.log(path.join("/home", "user", "dir", "file.txt"));
IMPORTANT
- 전역 객체임으로 바로 사용 가능
- URL 관련한 오브젝트
- 09_url.js - Github SourceCode
const myURL = new URL(
  "https://user:pass@sub.example.com:8080/p/a/t/h?query=string#hash"
);

console.log(myURL);
console.log(myURL.username); // username
console.log(myURL.password); // 비번

const myURL2 = new URL("https://example.org?user=abc&query=xyz&sort=asc");

const user = myURL2.searchParams.get("user");
const query = myURL2.searchParams.get("query");
const sort = myURL2.searchParams.get("sort");

console.log(myURL2.searchParams.keys());
console.log(myURL2.searchParams.values());

myURL2.searchParams.append("user2", "def"); // 새로운 키로 추가 가능
myURL2.searchParams.append("user", "def"); // 기존에 있는 키로 값을 추가하면, 동일한 키가 있으면 그대로 유지하고 하나 더 추가
myURL2.searchParams.set("user", "def"); // 동일한 키가 있으면, 기존 키를 삭제하고 새로 추가해야
console.log(myURL2);

console.log(myURL2.searchParams.getAll("user"));
myURL2.searchParams.delete("user"); // 해당 키를 삭제

console.log(myURL2.searchParams.toString());
IMPORTANT
- 전역 객체가 아님으로 require로 import 후 사용 가능
- URL 관련한 오브젝트
- 10_crypto.js - Github SourceCode
const crypto = require("crypto");

const pw = "pw1234";

// createHash - 암호화 알고리즘
// digest - 인코딩 방식
const cryptoPW = crypto.createHash("sha512").update(pw).digest("base64");
console.log(cryptoPW); // 9iSeOd1vv2qinR2UM5Aog5LmqBncF/oFeTTsPUjqwGoG3lG232280LqAScE7FR7HHe4K0gyedCN7iZDZl+NZaA==

const cryptoPW2 = crypto.createHash("sha512").update(pw).digest("hex");
console.log(cryptoPW2); // f6249e39dd6fbf6aa29d1d943390288392e6a819dc17fa057934ec3d48eac06a06de51b6df6dbcd0ba8049c13b151ec71dee0ad20c9e74237b8990d997e35968

// 레인보우 테이블 - 원본값과 다양한 암호화 알고리즘 결과를 가지고 있는 테이블
// pw1, sha512-base64, sha512-hex
// pw2
// 해커가 레인보우 테이블을 가지고 있더라도, 원래 평문을 알기 굉장히 어렵게 처리해야함.
// salting 암호화

const createSalt = () => {
  return new Promise((resolve, reject) => {
    crypto.randomBytes(64, (err, buf) => {
      if (err) reject(err);

      resolve(buf.toString("base64"));
    });
  });
};

const createCryptoPassword = async (plainPassword) => {
  const salt = await createSalt();
  //
  console.log(salt);

  return new Promise((resolve, reject) => {
    // 암호화할 평문, salt, 반복횟수, 출력할 바이트수, 해시 알고리즘, 콜백 함수
    crypto.pbkdf2(plainPassword, salt, 100000, 64, "sha512", (err, key) => {
      if (err) reject(err);

      resolve({ password: key.toString("base64"), salt: salt });
    });
  });
};

const test = async () => {
  const r = await createCryptoPassword("pw1234");
  console.log(r);
};

test();

const getCryptoPassword = (plainPassword, salt) => {
  return new Promise((resolve, reject) => {
    // 암호화할 평문, salt, 반복횟수, 출력할 바이트수, 해시 알고리즘, 콜백 함수
    crypto.pbkdf2(plainPassword, salt, 100000, 64, "sha512", (err, key) => {
      if (err) reject(err);

      resolve({ password: key.toString("base64"), salt: salt });
    });
  });
};

// 사용자가 로그인 하는 시점에 비번을 입력하면,
// 사용자 아이디, 비밀번호
// 데이터베이스에서 사용자 아이디를 조건으로 저장되어 있는 암호화된 비밀번호와 salt
// getCryptoPassword함수에 로그인 시 입력한 비밀번호 평문과 데이터베이스에서 조회한 salt 값을 전달
// 데이터베이스에 저장된 암호화된 비밀번호와 gwetCrytoPassword 함수로 전달받은 암호화된 password 값이 같은지 확인
// 같으면 로그인 처리
IMPORTANT
- 전역 객체가 아님으로 require로 import 후 사용 가능
- 파일 시스템 관련 객체, 동기/비동기 함수가 함께 존재
- 11_fs.js - Github SourceCode
const fs = require("fs");
// fs - filesystem

fs.readFile("./sample/text.txt", "utf8", (err, data) => {
  if (err) {
    throw err;
  }

  console.log(data);
});

console.log("1");

const data = fs.readFileSync("./sample/text.txt", "utf8");
console.log(data);

const txt = "파일 쓰기 테스트";
fs.writeFile("./sample/text_w.txt", txt, "utf8", (err) => {
  if (err) {
    throw err;
  }

  const data2 = fs.readFileSync("./sample/text_w.txt", "utf8");
  console.log(data2);
});

const txt2 = "파일 쓰기 테스트 동기 방식";

fs.writeFileSync("./sample/text_w2.txt", txt2, "utf8");
const data2 = fs.readFileSync("./sample/text_w2.txt", "utf8");
console.log(data2);
5. Express
- Node.js를 위한 빠르고 개방적인 간결한 웹 프레임워크
- BacnEnd 서버(API)를 구성하기 위한 오픈소스 기반의 프레임워크
IMPORTANT
Express는 JavaScript로 작성되고 Node.js 런타임 환경에서 구동되는 인기 있는 웹 프레임워크
- Express NPM
- Express 공식 싸이트
- MDN Express 공식 싸이트
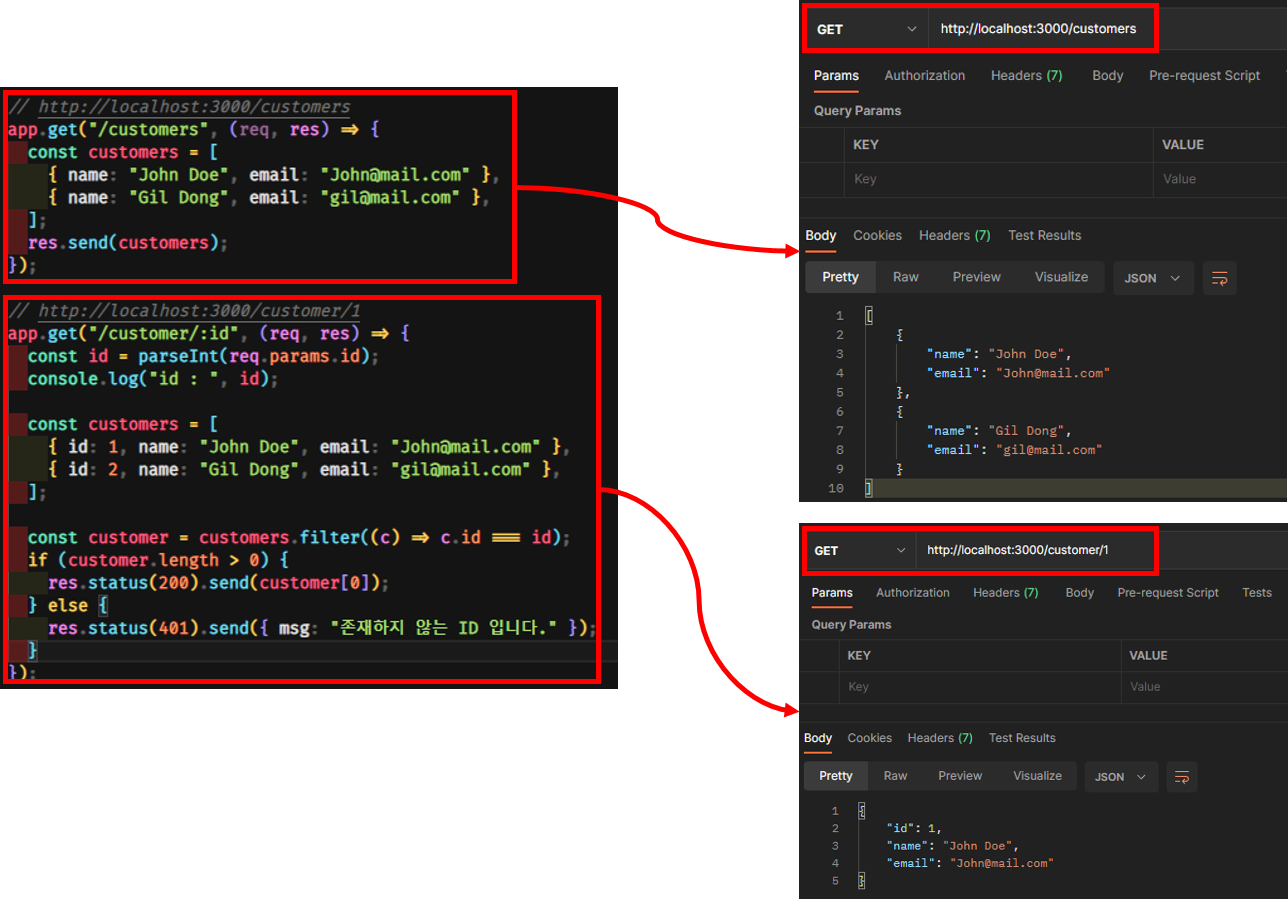
- 라우터로 인터프리터 방식으로 해석함(위에서 아래로)
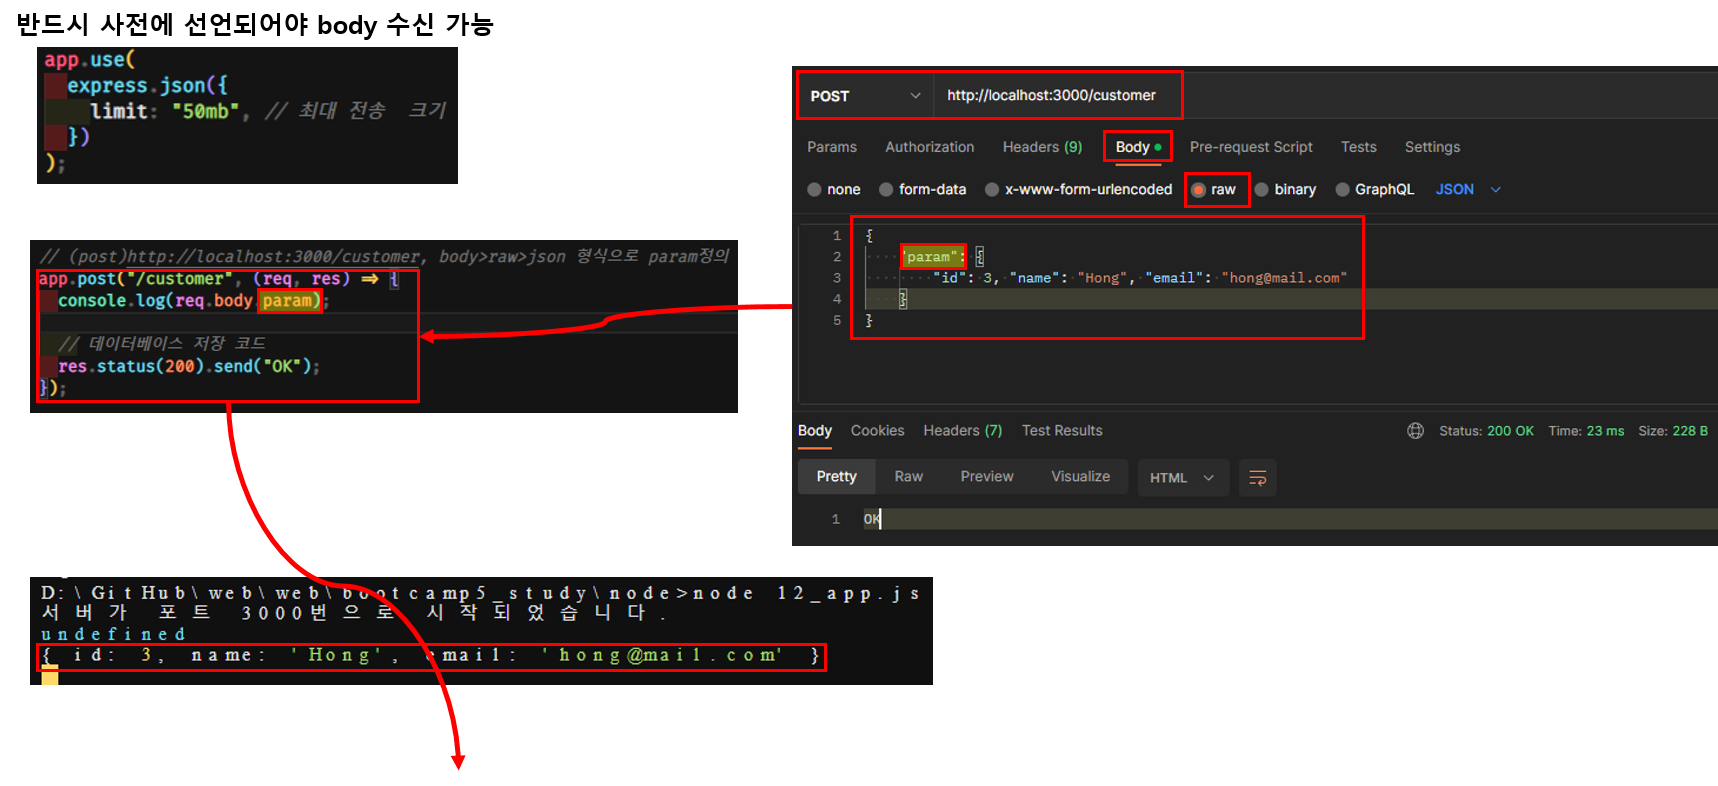
- post 방식은 body > raw > json 형식으로 전송 { “param”: {“id”:3, “name”: “walter”, “email”: “mail@mail.com” } }
- client -> server : body에 데이터보낼때 아래 옵션 필요
app.use(express.json({ limit: "50mb", }));
<!-- https://www.npmjs.com/package/express -->
>> npm i express
// express
const express = require("express");
const app = express();
const port = 3000;

// 선언하지 않으면 오류 발생
app.use(
  express.json({
    limit: "50mb", // 최대 50메가
  })
);

app.listen(port, () => {
  console.log("서버가 포트 3000번으로 시작되었습니다.");
});

// 라우터 (주소+http method)
app.get("/", (req, res) => {
  res.send("Hello World");
});

// http://localhost:3000/customers get
app.get("/customers", (req, res) => {
  // db에 있는 고객 정보를 조회하고 클라이언트로 응답
  const customers = [
    { name: "John Doe", email: "john@gmail.com" },
    { name: "Jane Doe", email: "jane@gmail.com" },
  ];
  res.send(customers);
});

app.get("/customer/:id", (req, res) => {
  const id = parseInt(req.params.id);
  console.log("id", id);
  // db에 있는 고객 정보를 조회하고 클라이언트로 응답
  const customers = [
    { id: 1, name: "John Doe", email: "john@gmail.com" },
    { id: 2, name: "Jane Doe", email: "jane@gmail.com" },
  ];

  const customer = customers.filter((c) => c.id === id);
  if (customer.length > 0) res.status(200).send(customer[0]);
  else {
    res.status(401).send({ msg: "존재 하지 않는 ID 입니다." });
  }
});

app.post("/customer", (req, res) => {
  console.log(req.body.param);

  // 데이터베이스에 저장 코드

  res.send("Ok");
});
6. My SQL 연동
- MySQL은 세계에서 가장 많이 쓰이는 오픈 소스의 관계형 데이터베이스 관리 시스템이다
IMPORTANT
Mac OS 설치 / MySql 공식 싸이트
- 무료 오픈소스 RDBMS이며, 다음의 중요한 명령어 참고
- brew list // 설치된 목록 조회
- brew services start mysql // mysql 서비스 시작
- brew services stop mysql / mysql 서비스 종료
- mysql_secure_installation // 초기 설정
- 간단한 비밀번호
- anonymous user 제거
- remotely disallow
- test database 제거
- 변경된 권한 테이블에 적용
- mysql -h localhost -u root -p // -h 접속주소, -u 접속 사용자
- mysql> status // utf8mb4 확인
- mysql> exit // 종료
- Workbench 설치
- https://dev.mysql.com/downloads/workbench/
- mysql와 연동되어 명령어들을 수행할 수 있는 IDE
IMPORTANT
Window OS 설치 / MySql 공식 싸이트
- 공식 다운로드 사이트 https://www.mysql.com/downloads/
- ‘Developer Default’ 선택으로 계속해서 설치
- 설치 완료 후 MySQL Workbench가 자동으로 실행
- MySQL Command Line Client로 질의어 가능
- services를 통하여 MySql 서비스를 시작, 중단, 자동, 수동 설정 가능
- 기본 연결 샘플 connection_sample.js - Github SourceCode
- MySQL Helper index.js - Github SourceCode
- MySQL QueryScript sql.js - Github SourceCode
- MySQL 실제 사용 13_app_mysql.js - Github SourceCode
- 반드시 스키마 권한 설정이 필요하다
- users and privileges > add account
- login tab > standard authendication type으로 나머지 정보 입력
- schema privileges tab
- add entry > selected schema 선택 > 추가할 스키마 선택
- select all 선택하여 모든 권한 부여
<!-- https://www.npmjs.com/package/mysql -->
>> npm i mysql
// mysql > index.js
// 가장 기본적인 연결 및 쿼리 샘플
var mysql = require("mysql");
var connection = mysql.createConnection({
  host: "127.0.0.1",
  port: 3306,
  user: "dev",
  password: "1234",
  database: "dev",
});

connection.connect();

connection.query(
  "SELECT * FROM dev.customers;",
  function (error, results, fields) {
    if (error) throw error;
    console.log(results);
  }
);

connection.end();
// query script 모음
module.exports = {
  productList: `select * from customers`,
  categoryList: `select * from product_category`,
  categoryDetail: `select * from product_category where product_category_id = ?`,
  categoryInsert: `insert into product_category set ?`,
  // insert into product_category set category_name='', category_description='', use_yn=''
  categoryUpdate: `update product_category set ? where product_category_id = ?`,
  categoryDelete: `delete from product_category where product_category_id = ?`,
};
- 추천하는 방법으로는 connection pool을 만들고 만들 pool을 활용한다.
// mysql 쿼리 실행을 위한 helper 함수
const mysql = require("mysql");
const sql = require("./sql");

const pool = mysql.createPool({
  host: "127.0.0.1",
  port: 3306,
  user: "dev",
  password: "1234",
  database: "dev",
  connectionLimit: 10,
});

const query = async (alias, values) => {
  return new Promise((resolve, reject) => {
    pool.query(sql[alias], values, (error, results) => {
      if (error) {
        console.log(error);
        reject(error);
      } else {
        resolve(results);
      }
    });
  });
};
// 실제 사용 샘플
const express = require("express");
const app = express();
const port = 3000;
require("dotenv").config({ path: "mysql/.env" });
const mysql = require("./mysql");

app.use(
  express.json({
    limit: "50mb",
  })
);

app.listen(port, () => {
  console.log("서버가 포트 3000번으로 시작 했습니다.");
});

// (get) http://localhost:3000/api/products
app.get("/api/products", async (req, res) => {
  const productList = await mysql.query("productList");
  res.status(200).send(productList);
});

// (get) http://localhost:3000/api/categories
app.get("/api/categories", async (req, res) => {
  const categoryList = await mysql.query("categoryList");
  res.status(200).send(categoryList);
});

// (get) http://localhost:3000/api/category/4
app.get("/api/category/:product_category_id", async (req, res) => {
  const product_category_id = req.params.product_category_id;
  const categoryList = await mysql.query("categoryDetail", product_category_id);
  res.status(200).send(categoryList);
});

// (post) http://localhost:3000/api/category
app.post("/api/category", async (req, res) => {
  const result = await mysql.query("categoryInsert", req.body.param);
  res.status(200).send(result);
});

// (put) http://localhost:3000/api/category/8
app.put("/api/category/:product_category_id", async (req, res) => {
  const product_category_id = req.params.product_category_id;
  const result = await mysql.query("categoryUpdate", [
    req.body.param,
    product_category_id,
  ]);
  res.status(200).send(result);
});

// (delete) http://localhost:3000/api/category/:product_category_id
app.delete("/api/category/:product_category_id", async (req, res) => {
  const product_category_id = req.params.product_category_id;
  const result = await mysql.query("categoryDelete", product_category_id);
  res.status(200).send(result);
});
IMPORTANT
.env
- 환경변수를 만들어서 사용할 수 있도록 도와주며, 숨기고 싶은 정보를 위함
.gitignore파일에.env등을 명시하여 repogitory에 등록되지 않는다.- npm을 통한 설치
npm install dotenv- 개발시는 .env.test, 라이브시는 .env.prod 로 구분하여 사용, package.json > script 영역에 다음과 같이 구분하여 사용
npm install cross-env설치- “test”: “cross-env NODE_ENV=test node 13_app_mysql.js”
- “prod”: “cross-env NODE_ENV=prod node 13_app_mysql.js”
- app.get(“env”); //NODE_ENV=test의 값인 ‘test or prod’를 가지고 온다.
- require(“dotenv”).config({ path:
mysql/.env.${app.get("env")}}); 와 같이 원하는 env 파일을 읽을 수 있다.
// .env 파일
MYSQL_HOST = 127.0.0.1
MYSQL_PORT = 3306
MYSQL_USERNAME = dev
MYSQL_PASSWORD = 1234
MYSQL_DB = dev
MYSQL_LIMIT = 10
// mysql 쿼리 실행을 위한 helper 함수의 pool 정의 부분이 env 파일 참조로 변경
const pool = mysql.createPool({
  host: process.env.MYSQL_HOST,
  port: process.env.MYSQL_PORT,
  user: process.env.MYSQL_USERNAME,
  password: process.env.MYSQL_PASSWORD,
  database: process.env.MYSQL_DB,
  connectionLimit: process.env.MYSQL_LIMIT,
});
// 실제 사용 샘플에 다름의 env 파일 내용 추가하는 코드 추가
const envValue = app.get("env"); //NODE_ENV=test의 값인 'test or prod'를 가지고 온다.
require("dotenv").config({ path: `mysql/.env.${app.get("env")}` });
7. Express 라우터
IMPORTANT
Express 프레임워크에서 제공하는 라우터
- 라우터에서 정규식을 사용가능
- 수 많은 라우터를 위하여
express.Router()를 사용하요 모듈별 분리 가능- 라우터에서 정규식 사용 샘플
- 라우터를 모듈별로 구분한 샘플 1
- 라우터를 모듈별로 구분한 샘플 2
- 모듈별로 구분된 라이터를 관리하는 프록시 샘플 2
// 라우팅 프록시 역할
const express = require("express");
require("dotenv").config({ path: "mysql/.env.test" });
const categoryRoute = require("./routes/category");
const app = express();

app.listen(3000, () => {
  console.log("서버가 포트 3000번으로 시작 되었습니다.");
});

app.use("/api/product", productRoute);
app.use("/api/category", categoryRoute);
// category 라우터
const express = require("express");
const router = express.Router();
const mysql = require("../mysql");

router.get("/:product_category_id", async (req, res) => {
  const product_category_id = req.params.product_category_id;
  const categoryList = await mysql.query("categoryDetail", product_category_id);
  res.send(categoryList);
  // res.send(categoryList[0]);
});

// 이하생략...

module.exports = router;
8. 정적 파일 처리
- 서버의 정적 파일 Display를 위한 방
IMPORTANT
서버에서 정적 파일(이미지, 첨부 파일 등등..)을 클라언트로 Display(다운로드)하기 위한 함수 Express Static 공식 싸이트
express.static(root, [options])함수 사용- static 파일 사용 샘플 github
// http://localhost:3000/images/router-1.png
app.use(express.static("public"));
// http://localhost:3000/thisIsStaticRootName/images/router-1.png
app.use("/thisIsStaticRootName", express.static("public"));
9. 파일 업로드(Multer)
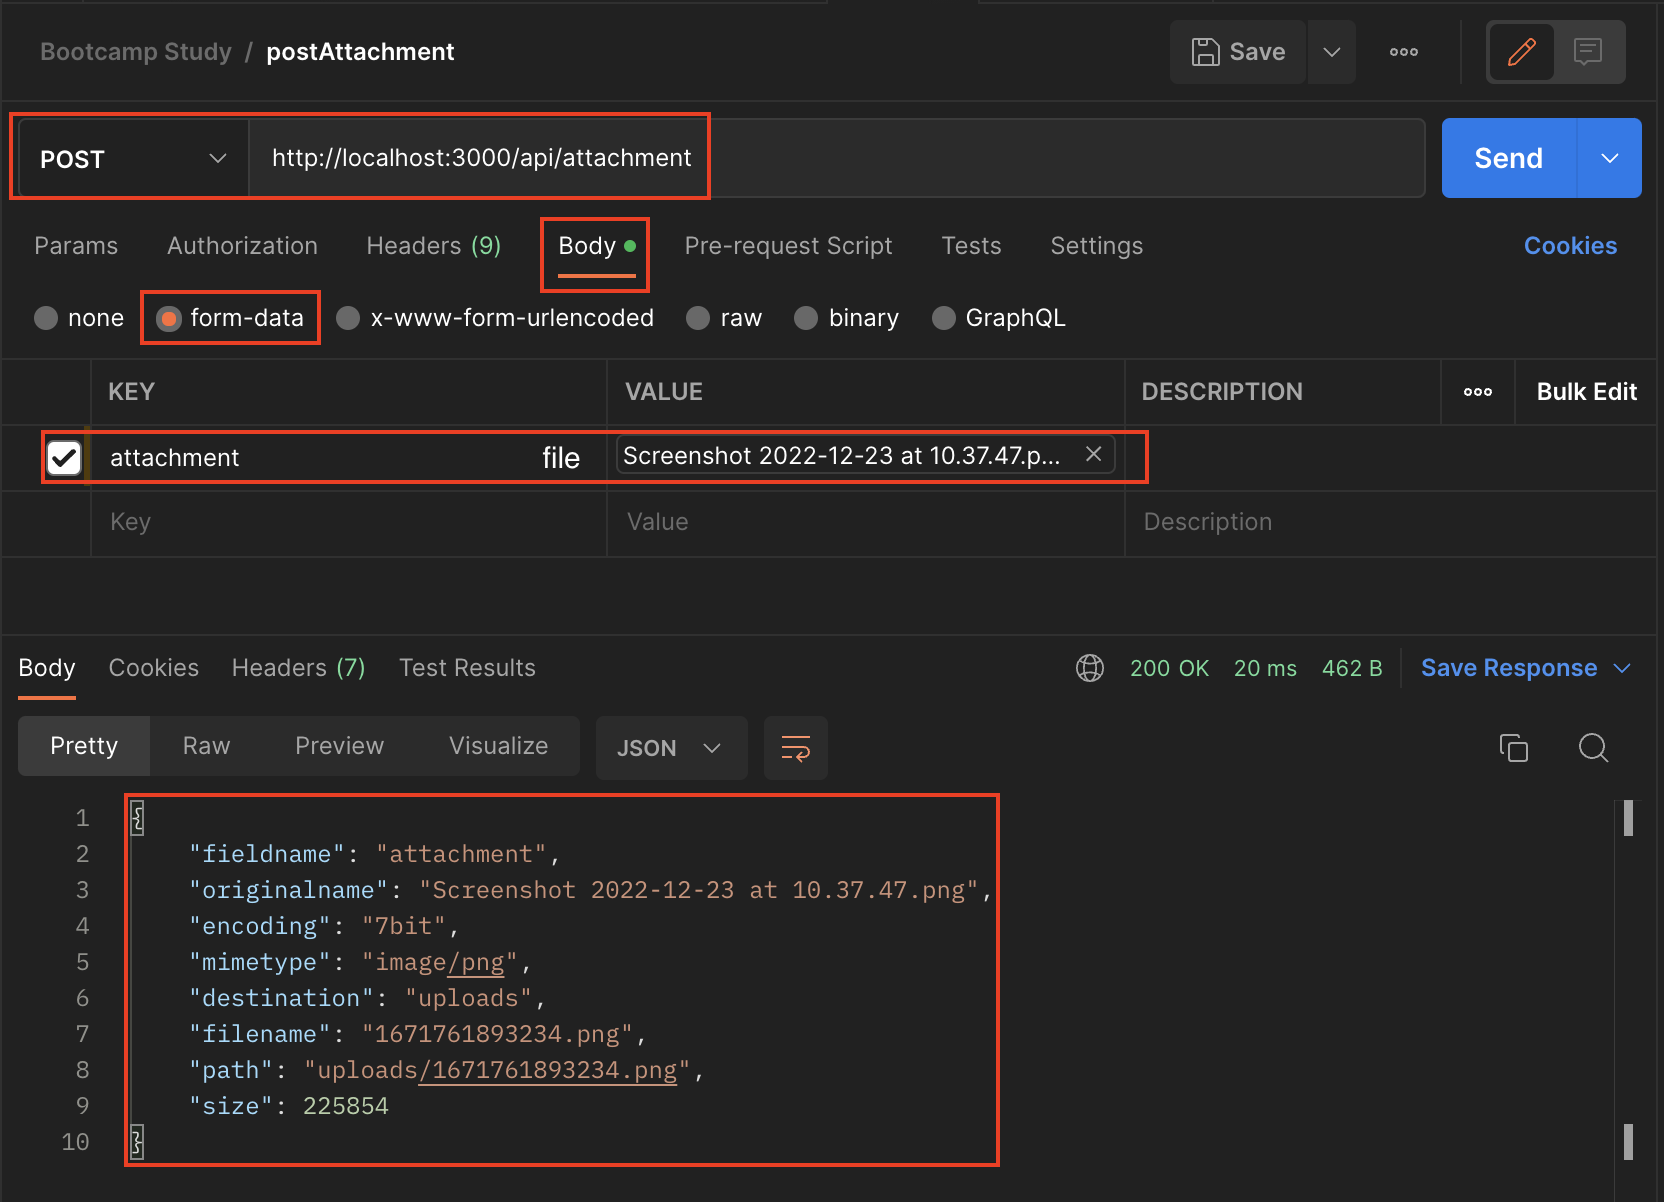
- Multer는 주로 파일 업로드에 사용되는 multipart/form-data를 처리하기 위한 node.js 미들웨어
IMPORTANT
Multer NPM 싸이트 Multer 한국어 Document
multer,path를이용multer.diskStorage()정의한 후multer.single or multer.array함수 사용- Multer 사용 샘플 코드 Github
10. 엑셀 업로드 및 파싱
- 거의 모든 스프레드시트에서 유용한 데이터를 추출하고 레거시 및 최신 소프트웨어에서 모두 작동하는 새 스프레드시트를 생성하기 위한 실전 테스트를 거친 오픈 소스 솔루션을 제공
IMPORTANT
- 가장많이 사용하는 excel 모듈이며, frendend에서 업로드한 excel을 backend에서 파싱하여 json 형태로 다시 frontend에 return -> frontend에서 엑셀 데이터 확인 후 backend api 호출하여 최종 데이터 저장
- xlsx npm 사용 샘플 코드 github
npm install xlsx // xlsx 모듈 설치
app.post('/api/xlsx', upload.single('xlsx'), async (req, res) => {
  console.log(req.file)

  const workbook = xlsx.readFile(req.file.path)
  const firstSheetName = workbook.SheetNames[0]
  const firstSheet = workbook.Sheets[firstSheetName]
  const firstSheetJson = xlsx.utils.sheet_to_json(firstSheet)

  res.status(200).send(firstSheetJson)
})

11. HTTP 응답 로그 관리
- nodejs에서 사용되는 로그(HTTP) 관리를 위한 미들웨어
- 특히나 HTTP Request에 대해서 집중적으로 로그를 다양하게 기록할 수 있음으로 좋은 시스템 로그 모듈로 사용 가능
IMPORTANT
morgan NPM 공식 싸이트 rotating-file-stream NPM 공식 싸이트
- 2가지 핵심 npm 설치가 필요
npm install rotating-file-streamnpm install morgan
app.use(
  morgan('combined', {
    stream: accessLogStream,
    skip: (req, res) => {
      // 비정상적인 응답인 경우는 로그를 기록하지 않음. 에러인 경우만 로그 기록
      return res.statusCode < 400;
    },
  }),
);
12. 개발자 로그 관리
- 개발자 필요에 의해서 로그 관리를 할 수 있는 미들웨어로 여러가지 다양한 옵션들을 제공
- 개발 환경 변수와 함께사용하여 develope, product 구분하여 로그 처리 가능
IMPORTANT
winston NPM 공식 싸이트 winston-daily-rotate-file NPM 공식 싸이트
- 2가지 핵심 npm 설치 필요
npm install winstonnpm install winston-daily-rotate-filenpm i app-root-path
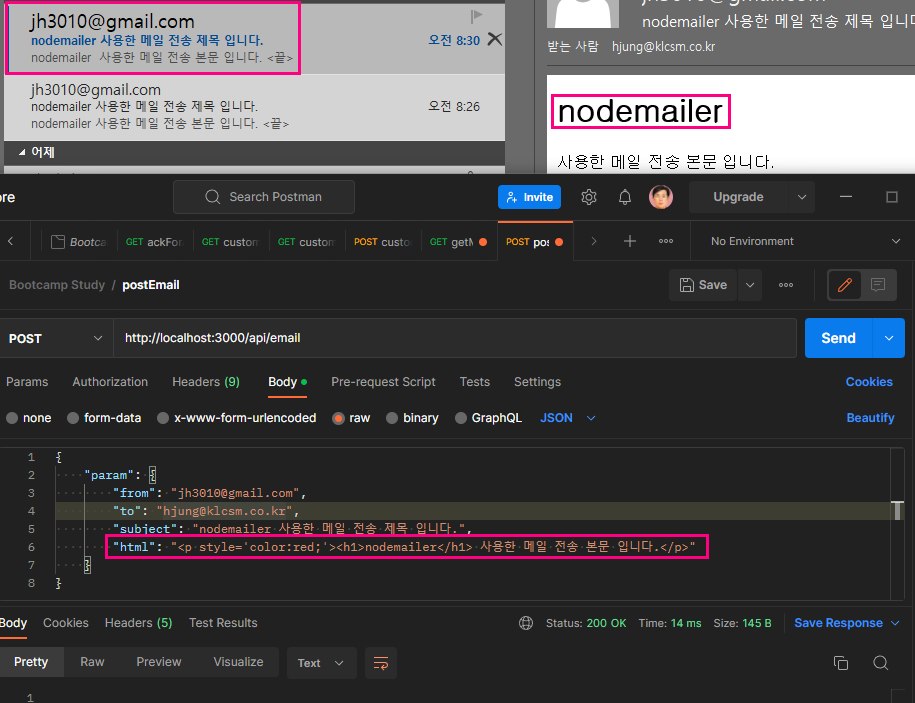
13. Email 발송
- 일반적인 Email 발송
- 일정 이벤트를 Email로 발송
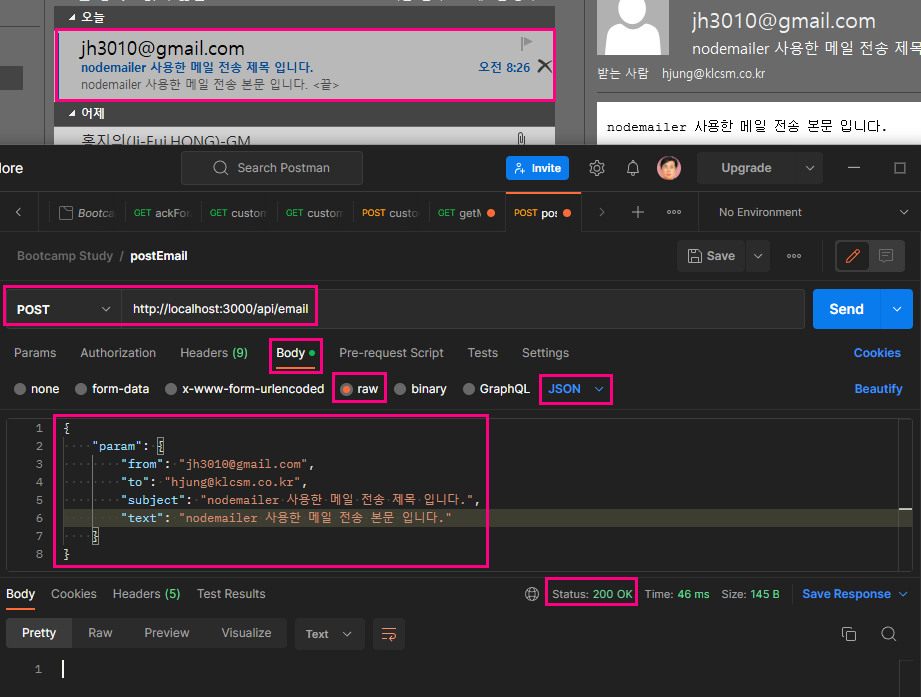
IMPORTANT
- nodemailer를 통하여 mail handling, ics를 통하여 canlendar handling 가능
- nodemailer
- 다른 모듈에 의존성이 없음
- 유니코드 지원 (영어, 한국어, 중국어등등 지원)
- 파일 첨부 가능, 메일 본문에 plain text, html 사용 가능
- Oauth2 가능하며, SMTP 연결을 위한 프록시 사용 가능
npm i nodemailer통하여 npm 패키지 설치- nodemailer index sample github
- nodemailer sample github
- nodemailer-sendgrid github
- ics
- iCalendar로 일정(모임) 정보를 생성하여 첨부 파일형태로 메일 전송 가능
npm i ics통하여 npm 패키지 설치- ics sample github
// nodemailer > .env
GOOGLE_MAIL=jh3010@gmail.com
GOOGLE_PASSWORD_FOR_WINDOWS=xxxxxxx
GOOGLE_PASSWORD_FOR_MAC=xxxxxxx
14 파일 다운로드
- 클라이언트측에서 서버측의 파일을 다운로드
IMPORTANT
- 파일형식을 알기위해서 mime npm 설치해야 하며, express에서는 코드 한줄로 파일 전송 가능
npm i mime, express를 사용할 경우 mime 설치 필요 없음
try {
  if (fs.existsSync(file)) {
    // express를 사용하지 않고 전송하는 샘플 코드
    const mimetype = mime.getType(file);
    const filename = path.basename(file);
    res.setHeader("Content-disposition", "attachment; filename=" + filename); // 다운로드 되는 파일명
    res.setHeader("Content-Type", mimetype); // 파일 형식 지정
    const filestream = fs.createReadStream(file);
    filestream.pipe(res);

    // express 사용하여 전송하는 샘플 코드
    res.download(file);
  } else {
    res.send("요청한 파일이 존재하지 않습니다.");
  }
} catch (e) {
  console.log(e);
  res.send("파일을 다운로드 하는 중 에러가 발생했습니다.");
}
15. Express 로그인 세션
- HTTP 통신
- 비 연결지향(Connectionless) - 클라이언트에서 서버로 요청(request), 서버가 요청에 대한 응답(response)을 클라이언트로 보내고 난 후 연결이 종료
- 상태정보유지를 안함(Stateless) - 통신 이후 바로 연결이 종료되기 때문에 서버는 클라이언트의 상태를 알 수 없
- 로그인-클라이언트와 서버간의 로그인 상태를 유지
- 세션, 쿠키를 사용
- 절차
- 클라이언트에서 로그인
- 서버가 이 로그인이 유효한지 검증하고, 맞다면 응답헤더에 쿠키정보를 넣어서 클라이언트로 송부
- 수신한 서버의 응답중 세션을 위한 인증값을 클라이언트 쿠키에 저장됨
- 클라이언트가 서버에 요청할 때 마다 쿠키 정보를 같이 헤더에 넣어서 송부
- s.id 혹은 sessionid
- 세션 - 브라우저가 종료되기 전까지 클라이언트의 요청을 유지하게 해주는 기술
- 세션 정보를 expess-session로 관리
IMPORTANT
express-session NPM cookie-parset
npm i express-session세션에 대한 핸들링 가능npm i cookie-parser클라이언트측의 cookie를 서버측에서도 사용 가능app.all('*', (req, res, next) => {...코드; next();})와 같이 모든 api 호출전 all 함수가 호출되며 내부 로직 수행 후 다음 api 호출을 위하여next함수 호출- app.all()은 인터프리터 방식이라 로그인없이 접근하는 함수의 경우 앞으로
const sess = {
  secret: 'secret key',
  resave: false, // 세션에 변경사항이 없어도 항상 다시 저장할지에 대한 여부
  saveUninitialized: true, // 초기화되지 않은 세션을 저장소에 강제로 저장할지에 대한 여부
  cookie: {
    httpOnly: false, // document.cookie 하면 쿠키 정보를 볼 수 없음
    secure: false, //true - https
    maxAge: 1000 * 60 * 60, // 쿠키가 유지되는 시간
  },
};
app.use(session(sess));
16. 작업 스케줄 / 결과 메일 송부
- 배치성 작업 스케줄
node-cron- node-cron 모듈은 GNU crontab을 기반으로 하는 node.js용 순수 JavaScript의 작은 작업 스케줄러이며, 이 모듈을 사용하면 crontab 구문을 사용하여 node.js에서 작업 예약 가능
- 작업 결과 메일로 송부
- 클라이언트에서 스케줄 설정 후 strat/stop API를 호출
- MySQL 연동된 결과를 메일로 생성하여 발송
IMPORTANT
- crontab 구문 사용가능한 스케줄
npm i node-cronnpm i uuid
17. 크롤링(인프런, 잡코리아)
- 인트런 크롤링
- 잡코리아 크롤링
IMPORTANT
- 특정 사이트를 크롤링하기 위해서 axios를 통하여 페이지 document 요소를 가지고, cheerio를 통하여 모든 element에 접근하여 원하는 정보를 수집
npm i axiosnpm i cheerio
18. Excel
- Excel 읽은 후 내용 변경하여 새로운 파일로 생성
- DB 데이터로 엑셀 파일 생성
- DB 읽고 엑셀 파일로 다운로드
- DB 읽고 엑셀 파일 첨부하여 메일 송부
- 스타일 적용
IMPORTANT
XLSX NPM 싸이트 xlsx-js-style NPM 싸이트
- 엑셀을 활용한 다양한 구현 방법 샘플코드
npm install xlsxnpm install xlsx-js-stylexlsx를 포함하고 있음으로 xlsx 설치 필요 없음
19. CORS
- CORS(Cross-Origin Resource Sharing, 교차 출처 자원 공유)
웹 애플리케이션은 자신의 출처와동일한 리소스만 불러올 수 있으며, 다른 출처의 리소스를 불러오려면 그 출처에서 올바른 CORS 헤더를 포함한 응답을 반환해야 한다. 이는 시스템 수준에서 타 도메인 간 자원 호출을 승인하거나 차단하는 것을 결정하는 것이다.CORS는 웹페이지상에서 자바스크립트를 이용하여XHR(XMLHttpRequest)을다른 도메인으로 발생 시킬 수 있도록해주는 기능을 가지고 있고 XHR 기반 cross-origin HTTP 요청을 이용하여 자원을 공유해야 하는 브라우저와 서버 간의 안전한 교차 출처 요청 및 데이터 전송을 지원한다.
- SOP(Same-Origin Policy, 동일 출처 정)
자바스크립트 엔진 표준 스펙의 보안 규칙으로하나의 출처(Origin)에서 로드된 자원(문서나 스크립트)이 호스트나 프로토콜, 포트번호가 일치하지 않는 자원과 상호작용 하지 못하도록 요청 발생을 제한하고,동일 출처(Same Origin)에서만 접근이 가능한 정책- 두 URL의
Port(명시한 경우),Protocol,Host가 모두 같아야 Same Origin ‘scheme/host/port 튜플(tuple)’ 혹은 그냥tuple이라고 하기도 한다.
IMPORTANT
CORS(Cross-Origin Resource Sharing) & SOP(Same-Origin Policy)
- 웹 어플리케이션에서 보안상의 이유로 동일 URL에서(즉, 신뢰할 수 있는)만 서로 데이터 교환이 가능
- Origin : http://localhost:3000 (http:프로토콜, localhost:호스트, 3000:포트)
- Origin이 다른경우 잠재적인 보안 위협이 있을 수 있음으로, 다른 Origin 리소스를 가져올 수 없다.(기본 정책)
- Static Web Server와 API Server가 다른경우, 또는 아예 다른 도메인을 가진 시스템에서 API Server로 접근
- CORS Sample Github
- CORS FROM HTML Sample Github
- CORS FROM Sample Github
// 기본적으로 모든 라우터에 적용
const corsOptions = {
  origin: "http://localhost:8080", // 허용할 origin 설정
  optionsSuccessStatus: 200,
};
app.use(cors(corsOptions));

// 특정 라우터에만 적용
const corsOptionsExternal = {
  origin: "http://localhost:8081",
  optionsSuccessStatus: 200,
};

app.get("/api/products", cors(corsOptionsExternal), (req, res) => {
  res.send("제품 정보");
});
20. Sequelize
- 시퀄라이즈(Sequelize)는 데이터베이스(Database) 작업을 쉽게 할 수 있도록 도와주는 ORM 패키지
- ORM(Object-Relational Mapping)은 자바스크립트 객체와 관계형 데이터베이스를 서로 연결해주는 도구
- 모든 데이터 테이블을 오브젝트(object)로 파단하여 쿼리문 없이 객체간 관계를 기반으로 데이터 조작 가능
IMPORTANT
sequealize NPM 싸이트
sequealize homgpage
mysql2 NPM 싸이트
mysql2 homepage
sequelize-cli NPM 싸이트
sequelize-cli homepage
- MySQL, MariaDB, MS SQL 등과 같은 RDBMS 데이터베이스를 위한 promise 기반의 Node.js ORM 도구
[npm install sequelize]node.js ORM toolnpm install mysql2간략 설명sudo npm install -g sequelize-cli간략 설명sequelize init로 초기화 (다음의 폴더와 기본 파일이 자동으로 생성)
config폴더 : mysql과 연결 정보 관리 (mysql > .env 파일을 이용가능)models폴더 : mysql 테이블과 연동하기 위한 모델 정보가 위치하는 폴더
- sequelize-cli로 모델 정보 생성 및 초기화
sequelize-cli model:generate --name product_category --attributes product_category_id:integer, category_name:string, category_description:string, use-yn:string을 통하여models>categories.js파일 생성timestamp: false로 createdAt, updatedAt 컬럼이 없음으로 사용하지 않음으로 정의 필요product_category.init({...})에 하기와 같이 어트리뷰트를 상세하게 정의 가능model의 class 명은 물리 테이블(product_category)의 명칭과 일치화 시킴
// type, primaryKey, allowNull, unique, defaultValue, autoincreament
product_category_id: { type: DataTypes.INTEGER, primaryKey: true, autoIncrement: true, },
category_name: { type: DataTypes.STRING, allowNull: false },
category_description: DataTypes.STRING,
use_yn: { type: DataTypes.STRING, defaultValue: "Y" },
tableName: 'product_category'와 같이 물리 테이블의 명칭과 일치화 시킴
21. MongoDB & Mongoose
- 몽고DB(MongoDB)는 크로스 플랫폼
도큐먼트 지향 데이터베이스시스템이다. NoSQL데이터베이스로 분류되는 몽고DB는JSON과 같은 동적 스키마형 도큐먼트들(몽고DB는 이러한 포맷을BSON이라고 함)을 선호함에 따라 전통적인 테이블 기반관계형 데이터베이스 구조를 사용하지 않는다. 이로써 특정한 종류의 애플리케이션을 더 쉽고 더 빠르게 데이터 통합을 가능케 한다.- 장점
- 비동기 드라이버를 사용
- 현재 JDBC의 경우 동기 드라이버만 존재해 블러킹 포인트가 된다.
- RDB와 개념이 유사해, 쿼리 변환기가 있을 만큼 개념적으로 어색하지 않음 (사용법도 유사함)
- RDB에 비해 성능이 100배 이상 빠름 (별도의 캐시 솔루션이 필요없음)
- 스키마 관리가 필요 없음
- 성숙기에 접어들어 운용, 개발, 유틸리티에 부족함이 없음
- Cassandra, Couchbase, Mongodb의 경우 대규모 트래픽, 데이터 저장, fail-over, fault-tolerance에 다양한 대안이 마련 되어 있는 상황
- redis과 비교해도 충분히 안정권에 들어온 상태
- 샤드 추가가 간편
- 다른 NoSQL 처럼 리밸런싱은 불가능하지만, 그럼에도 적정 수치때 샤드를 추가해준다면 장점은 충분히 누릴 수 있음
- 샤드 : 부하 분산을 위해 다수의 데이터베이스에 데이터를 분산 저장하는 기법
- 비동기 드라이버를 사용
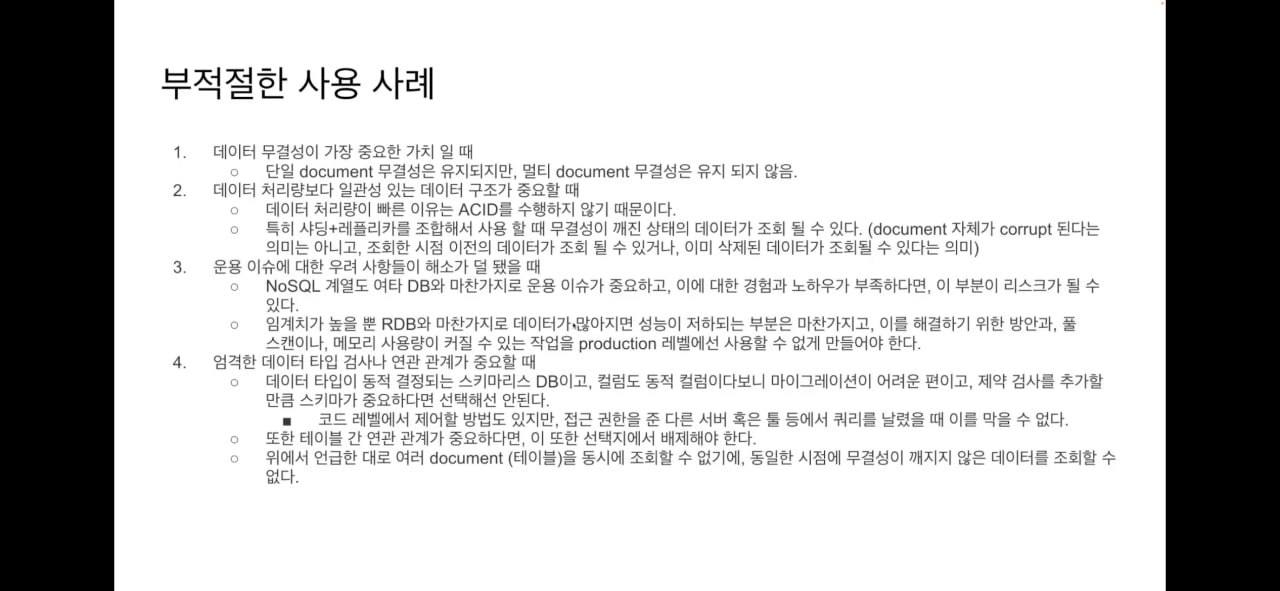
- 단점
- 복잡한 쿼리를 사용할 수 없음 (join 구문 사용 불가)
- 메모리 사용량이 큰 편 (메모리 부족시 성능 저하)
- 데이터 일관성이 보장되지 않음
- ACID(원자성, 일관성, 고립성, 지속성) 도입 베타 릴리즈 진행 중
- ACID : 데이터베이스 트랜잭션이 안전하게 수행된다는 것을 보장하기 위한 성질을 가리키는 약어

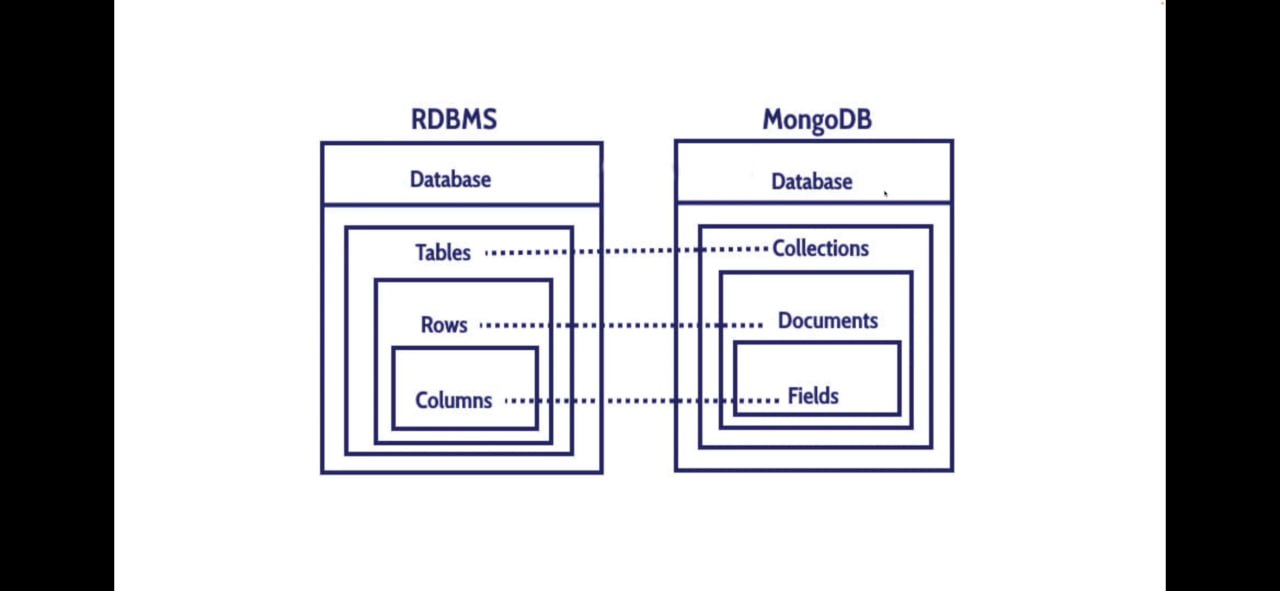
IMPORTANT
- 몽고DB는 크로스 플랫폼 도큐먼트 지향 데이터베이스 시스템이다. NoSQL 데이터베이스로 분류되는 몽고DB는 JSON과 같은 동적 스키마형 도큐먼트들을 선호함에 따라 전통적인 테이블 기반 관계형 데이터베이스 구조의 사용을 지양한다.
brew services start mongodb-community// 서비스 시작brew services stop mongodb-community// 서비스 종료brew services list// brew 서비스 목록 조회mongoshormongo// shell 접속
use admin// admin 사용자로 전환db.createUser({user:"root",pwd:"1234",roles:[{"root"}]})사용자 생성
mongod --config /opt/homebrew/etc/mongod.conf// mongod.conf 파일 위치
sesurity: authorization: enabled를 추가하여 인증 활성화
mongosh admin -u root -p 1234// mongo [데이터베이스이름] -u [사용자이름] -p [비밀번호]
- MongoDB 연결 및 기본적인 CRUD 수행
IMPORTANT
mongodb NPM 싸이트
mongoose NPM 싸이트
- sequelize와 유사하게 ORM 형식으로 CRUD 사용 가능
npm install mongodb를 통하여 npm 등록- mongodb homepage
npm install mongoose를 통하여 npm 등록- mongoose homepage
// 하기와 같은 패턴의 경우 함수를 무조건 실행부터 함
(function() {
  함수코드
 })();
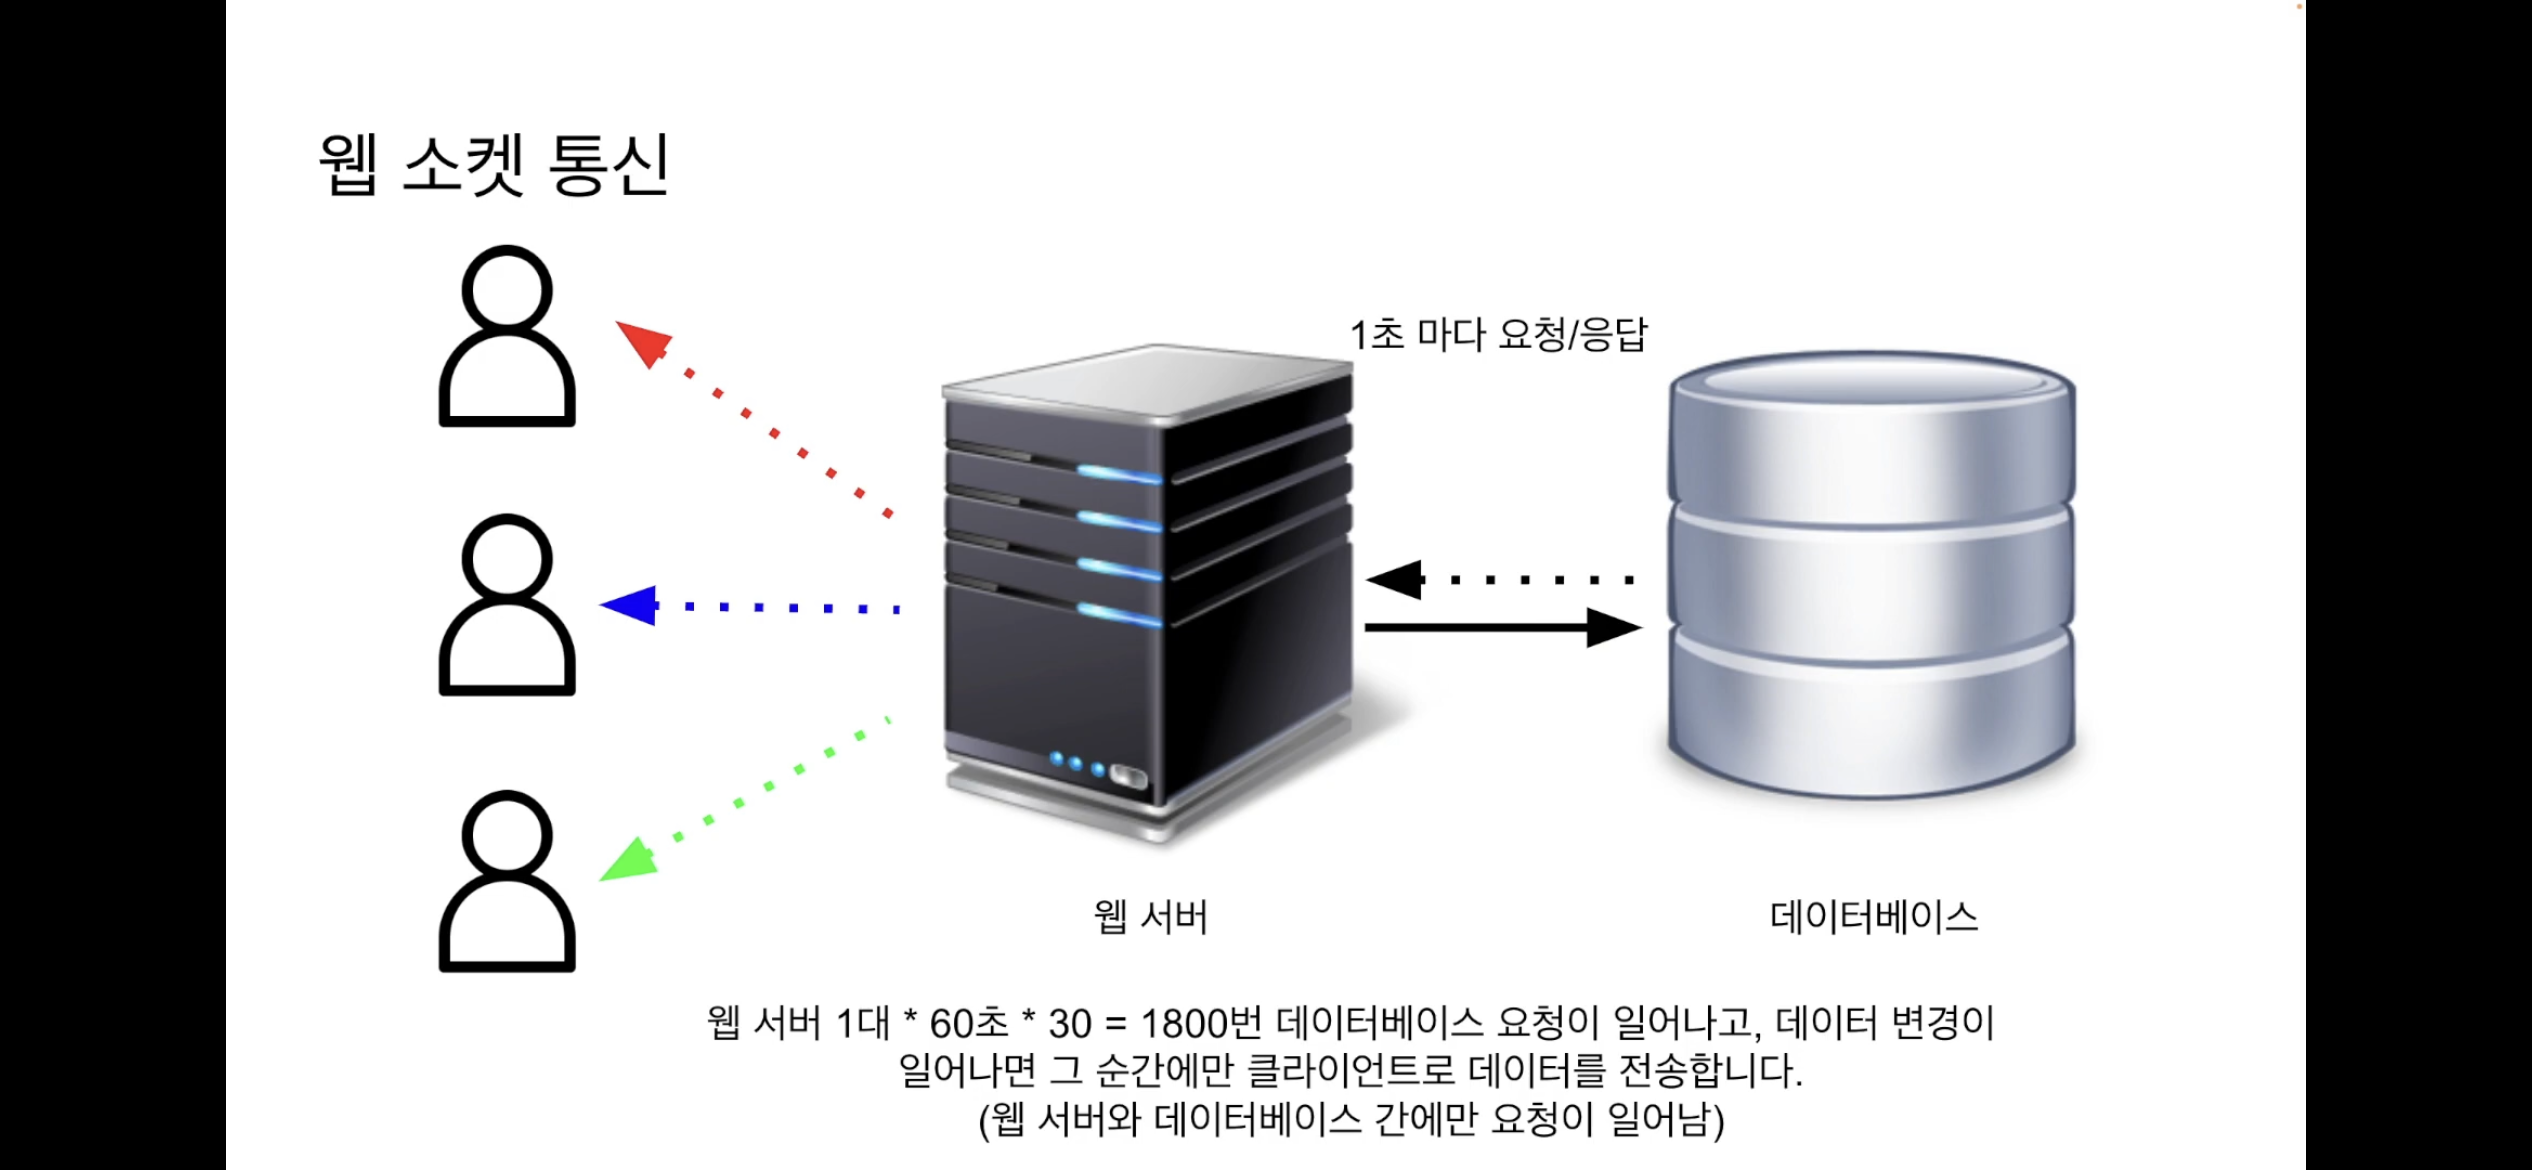
22. WebSocket
- 클라이언트와 서버간의 양방향 통신
- 웹 소켓 이전의 통신 방법 : HTTP(HyperText Transfer Protocol)
- Client > HTTP Request 통하여 서버로 요청을 전송
- Server > HTTP Response 통하여 클라이언트로 응답을 전송
클라이언트 요청 없이는 서버는 클라이언트로 데이터를 전송할 수 없음- 그래서 서버쪽에 데이터가 변경되어도 클라이언트가 서버로 요청을 보내지 않는 이상 변경된 데이터가 클라이언트에 반영되지 않음
- Ex) 실시간 주식 (클라이언트 Javascript로 setInterval() 함수를 사용하여 주기적으로 서버에 요청을 보냄)
- 웹소켓(Web Socket)
- 하나의 TCP(Transmission Control Protocol) 접속에 전이중(양방향) 통신 채널을 제공하는 컴퓨터 통신 프로토콜로 클라이언트와 서버간의 양방향 통신이 가능.(Client <> Server 소켓 연결을 유지하여 언제든지 쌍방 통신 가능)
- HTTP 통신
- Socket 통신

IMPORTANT
- 클라이언트, 서버가 TCP 통신을 가능하게하는 패키지
npm install socket.iosocket.io 패키지 설치- socket.io cdn 설치 싸이트
const io = new Server(httpServer, {
  cors: {
    origin: "http://localhost:8080",
    methods: ["GET", "POST"],
  },
});

io.on("connection", (socket) => {
  socket.on("disconnect", () => {
    // 클라이언트가 접속을 종료했을 때
  });

  socket.on("cleint2server", (data) => {
    console.log(data);

    // 접속된 모든 클라이언트에게 msg를 전송
    io.emit("event_name", msg);

    // 메시지를 전송한 클라이언트에게만 전송
    socket.emit("event_name", msg);

    // 메시지를 전송한 클라이언트를 제외한 나머지 모두에게 전송
    socket.broadcast.emit("event_name", msg);

    // 지정된(socket_id) 특정 클라이언트에게만 메시지 전송
    io.to(socket_id).emit("event_name", msg);
  });
});
23. forever
- script 파일을 무중단 실행(백그라운드)하는 node.js package
IMPORTANT
forever NPM 싸이트
forever homepage
- node.js 앱을 실행시키거나 비정상 종료되었을 때 재실행을 시켜주는 관리도구
npm i foreverforever 패키지 설치
forever start 39_forever.js // 'start' 명령으로 node 파일 실행
forever stop 39_forever.js // 'stop' 명령으로 node 파일 중지
forever list // 'list' 명령으로 실행중인 파일(프로세스) 목록 조
24. Cluster
- Node.js 싱글 스레드로 동작하고, 단일 CPU 코어에서만 실행
- cluster를 사용하면 서버 자원을 모두 사용하면서, Node.js 멀티스레드로 동작되는 것 처럼 병렬처리 할 수 있게 됨
IMPORTANT
내장 함수로 별도의 npm 설치 필요 없음
H/W 자원을 효율적으로 사용(싱글스레드 > 멀티스레드)
25. pm2
- Node.js 어플리케이션을 쉽게 관리할 수 있게 해주는
Process Manager이다.Node.js 어플리케이션을 cluster mode 로 실행시킨다거나, 메모리가 넘친다거나, 오류로 인해 프로세스가 종료되는 등의 상황에 직면했을 때 각각의 상황을 사용자가 모두 신경 써서 처리해줄 수도 있지만, 너무 복잡하고 신경 써야 할 일들이 많아진다. PM2 is a daemon process manager that will help you manage and keep your application online. Getting started with PM2 is straightforward, it is offered as a simple and intuitive CLI, installable via NPM.
IMPORTANT
- Node.js 어플리케이션 실행을 관리할 수 있는 프로세스 관리자, 설정된 값을 기준으로 자동으로 clustering 가능
sudo npm install -g pm2pm2 패키지 등록pm2 list: 목록 조회pm2 delete [file name or id or pid]: [file name or id or pid] 삭제pm2 delete all: 모든 프로세스 삭제pm2 start [file name]: [file name] 실행pm2 stop [file name or id or pid]: [file name or id or pid] 중단pm2 logs: 로그 확인pm2 monit: 모니터링 대쉬보드pm2 start [file name] -i 4: cpu 4개 지정해서 cluster화 해서 실행pm2 scale [file name or id or pid] +3: 기존 [file name or id or pid]에 cpu 추가
26. API Server Configuration
- API 서버에 접근하기 위해서는 접근키(Access Key)를 발급받아 인증 후 특정 API를 사용할 수 있도록 한다.
- uuid-apikey를 발급받을 수 있는 UI와 데이터베이스(Database)를 개발하여 함께 사용하면 유용하다.
- 외부에서 API에 접근하는 용도로 사용과 기존의 API 서버와 분리를 권장한다.
IMPORTANT
uuid-apikey NPM 싸이트
uuid-apikey homepage
- uuid-apikey로 access key를 발급받고 발급받은 키를 데이터베이스(Database)에 저장하여 관리도 가능
- access key가 유효하지 않은 접근의 경우 거부하여 API Server를 구성할 수 있다.
npm i uuid-apikeyaccess key 생성을 위한 npm 설치
const uuidAPIKey = require("uuid-apikey");
// console.log(uuidAPIKey.create());
// {
//     apiKey: 'MKW83V4-V9N40AF-Q026AC2-PPETNWA',
//     uuid: 'a4f881ec-da6a-4029-b804-6530b59daaf1'
// }

const accessKey = {
  apiKey: "MKW83V4-V9N40AF-Q026AC2-PPETNWA",
  uuid: "a4f881ec-da6a-4029-b804-6530b59daaf1",
};

app.get("/api/:apikey/categories", async (req, res) => {
  const apikey = req.params.apikey;
  if (apikey === accessKey.apiKey) {
    if (uuidAPIKey.toUUID(apikey) === accessKey.uuid) {
      const categoryList = await mysql.query("categoryList");
      res.send(categoryList);
    } else {
      res.send("apikey가 정상적이지 않습니다.");
    }
  } else {
    res.send("apikey가 존재하지 않습니다.");
  }
});

27. Useful Node Modules
- validator : 유효성 검사
- moment : 날짜 관련
- dayjs : moment의 light 버전
- fs-extra : fs(file system) 패키지의 확장판
IMPORTANT
npm install command
npm i validatorvalidator npm 등록npm i momentmoment npm 등록npm i dayjsdayjs npm 등록npm i fs-extrafs-extra npm 등록
// validation CDN
<script type="text/javascript" src="validator.min.js"></script>
<script type="text/javascript">
  validator.isEmail('foo@bar.com'); //=> true
</script>
Leave a comment